

Caravans
Part 2
Undercarriage
Ok, so you've got your caravan base but as you'll have noticed, when taking off the unwanted bits it's also removed most of the undercarriage as well, so now we need to rebuild that.
Start by making yourself a new, empty cell and drop a large floor in the very middle, set it's X, Y, Z's to 0.

Now drag the original wagon into the cell and center that as well.

Using the wagon as a base rebuild the undercarriage using parts available in the CK, I use the Dwemer pipe sets myself with their scale set to 0.1 and a couple of curved wooden beams.

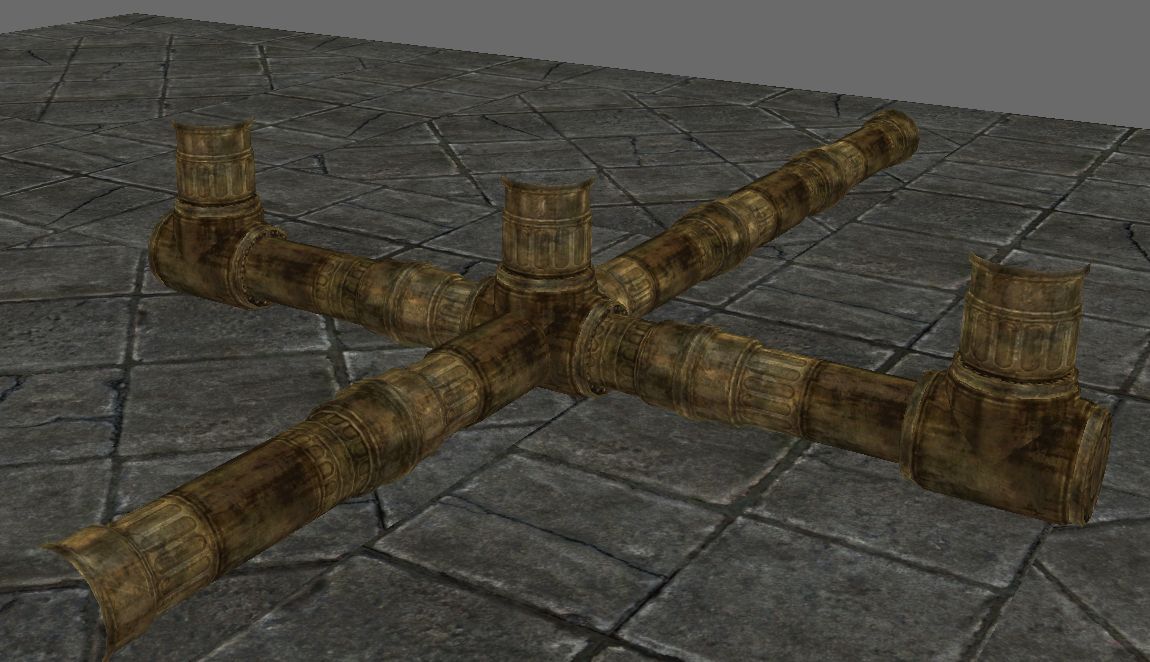
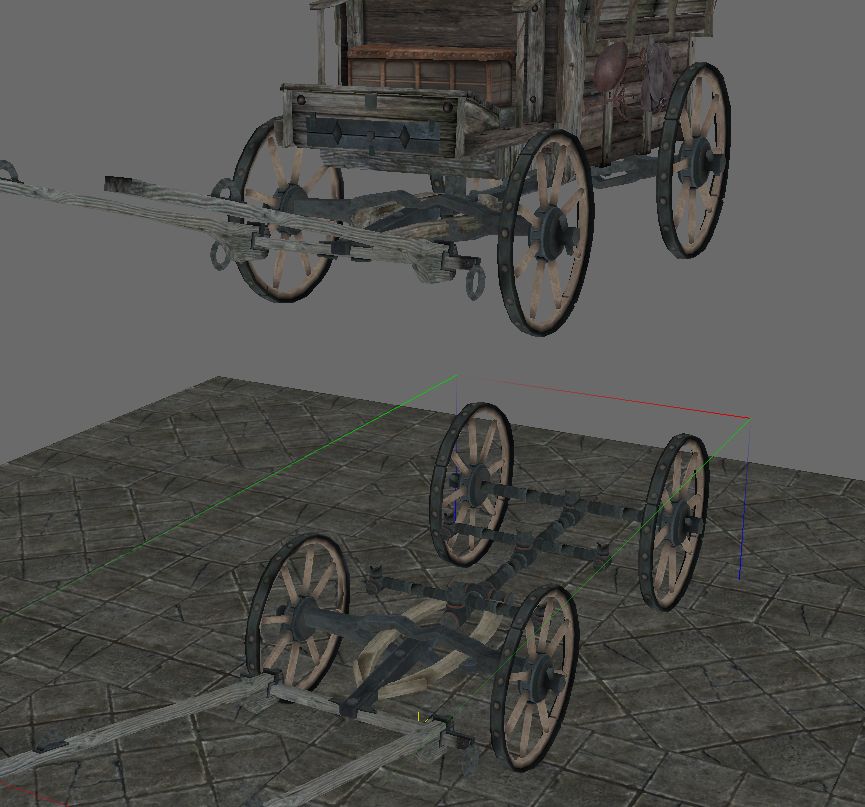
Here's a quick look at the first 5 pieces with the wagon out of the way, x5 for the main axle, x3 for the cross axle and a few Pipe3Way01's for the uprights.
A good rule to follow is to export any nif's you use as you use them, these will be needed in a bit!
Once you're happy with your new undercarriage it's time to import the pieces into the stripped cart nif.
Open 2 copies of NifScope, in the first load your stripped cart nif and in the second load the first of the new pieces to be added.
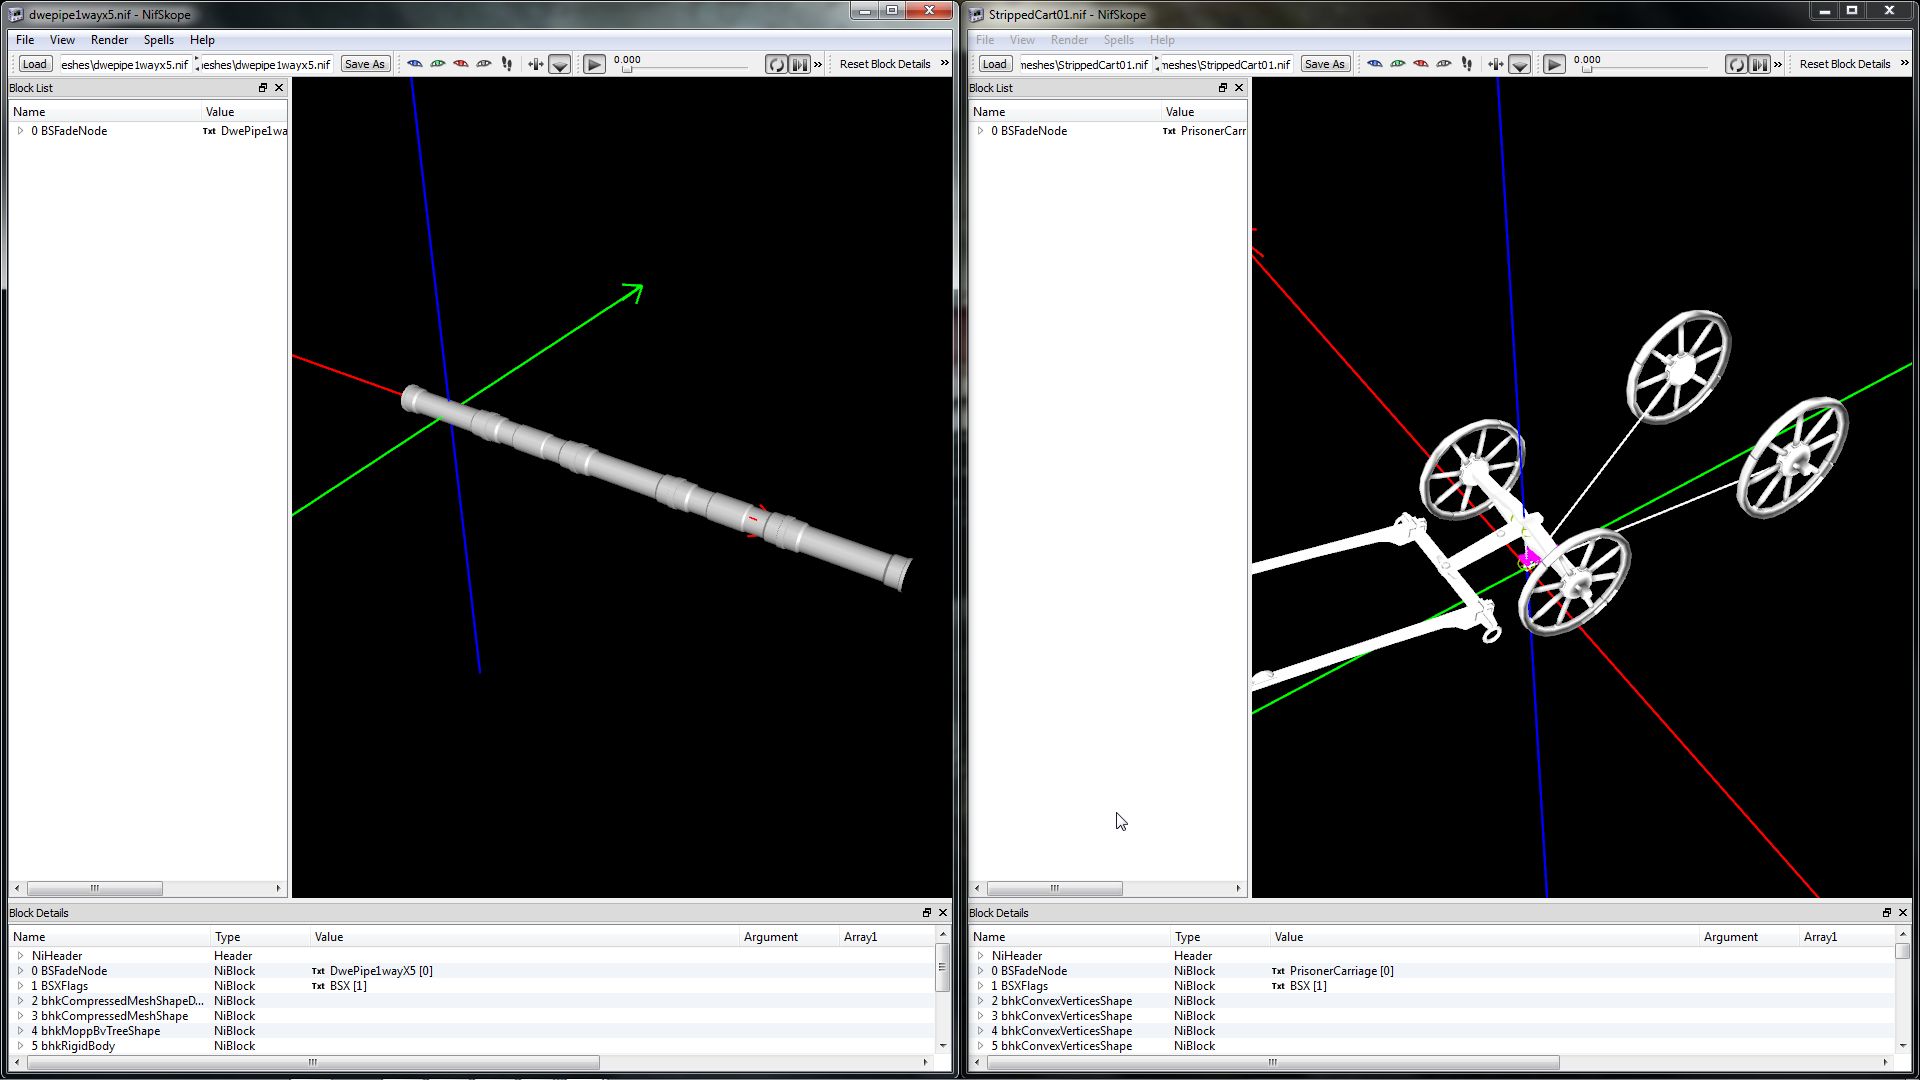
Right-click the Root branch of your stripped cart (0 BSFadeNode) and click <Node>/<Attach Node>.
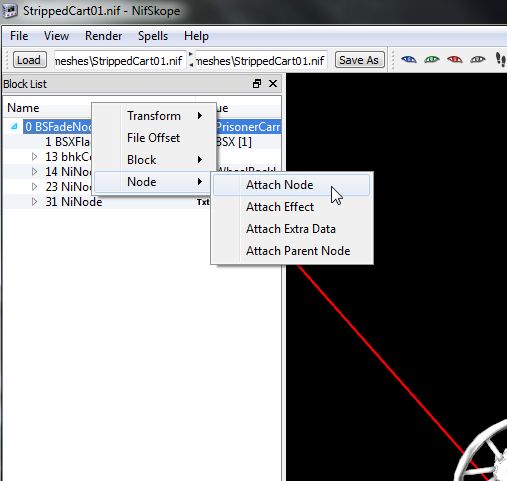
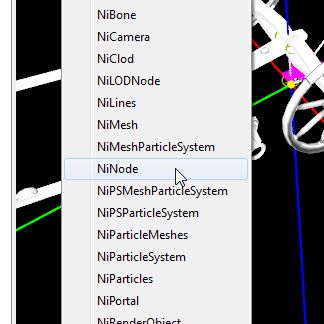
In the long list that appears find & click <NiNode>.
Now in the NiNodes properties click the <TXT> bit in the <Name> section.
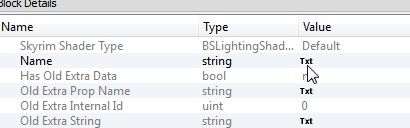
And give it a name, this will be used as a sort of folder/holder for all the pieces that will go into making the undercarriage. This way, when the NiNode's branch is collapsed, there will only be one entry in the objects tree list
instead of every piece that goes into making up the undercarriage! We shall be using this method for all the sections of the carriage: Undercarriage, Exterior, Interior, possibly roof, objects to be moved during run-time interior & exterior etc.
You can break the build up into as many pieces as you like using this method, separate floors from walls, walls from ceiling.....This makes later editing and/or texturing a lot easier!
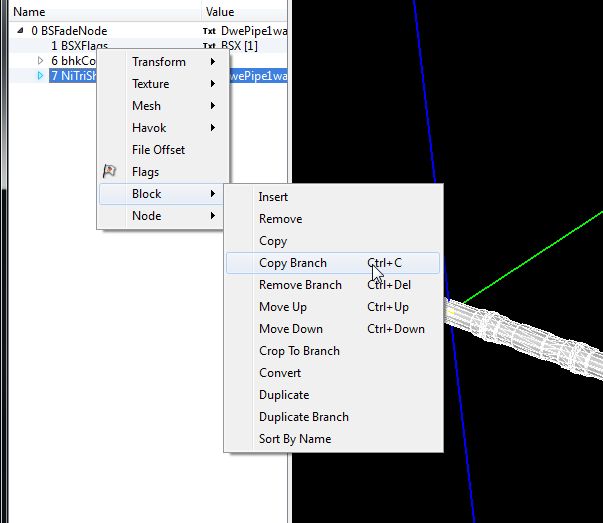
Now over to your new undercarriage piece, click the object in the render window to high-light the mesh object's branch, right-click the high-lighted branch and click <Block>/<Copy Branch>.
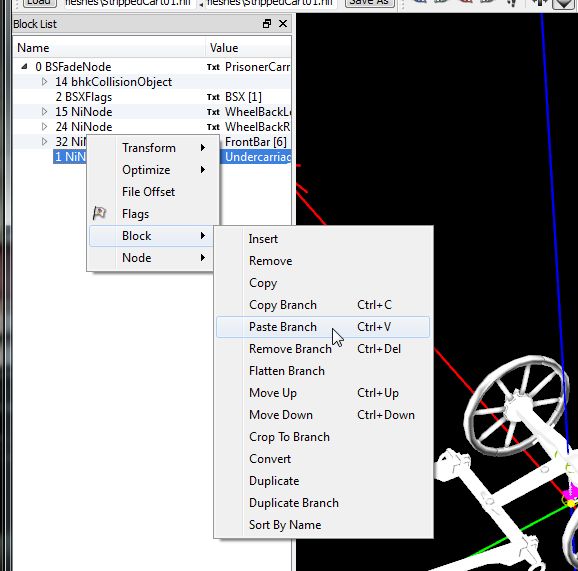
And back to your caravan and right-click your new NiNode in the tree and click <Block>/Paste Branch>.
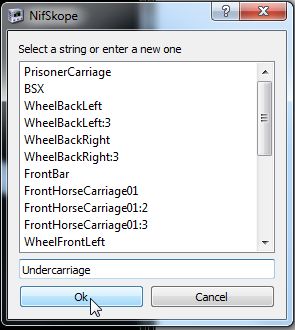
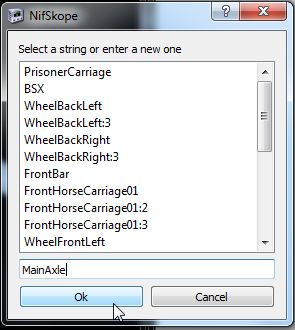
Again, click the <TXT> in the <Name> section and give your new mesh a unique name. Only one name is needed per mesh, if you use the same mesh again and it does not get the same name click the <TXT> option
and scroll down the list to find it, select it, and hit OK.
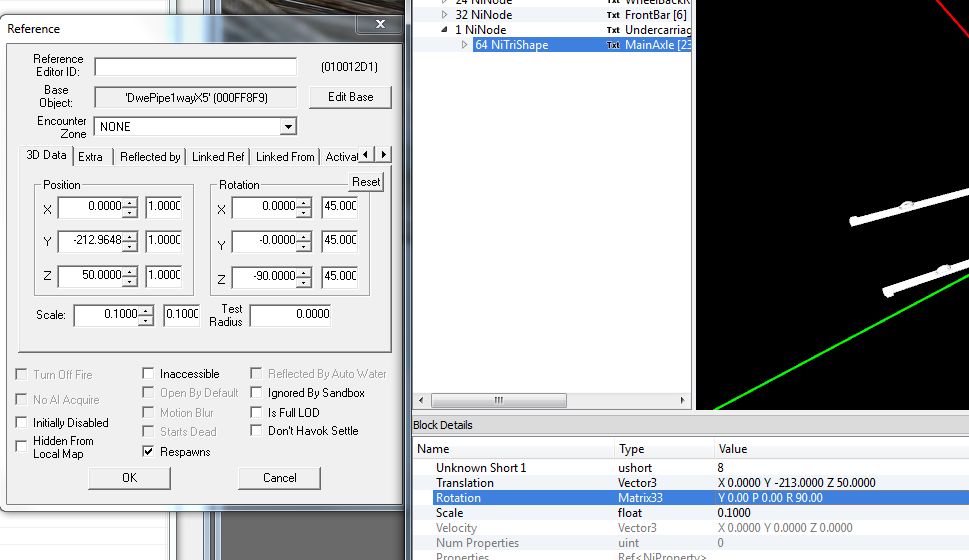
Now scroll down a little in the objects properties and you'll find three settings all together: Translation, Rotation & Scale.
Use the values from the original in the CK to position your mesh in the correct location at the correct angle.
Nifscope CK
Translation = Position
Rotation = Rotation.......BUT, for some reason the rotation in NifScope is always reversed from that in the CK,
as you can see Rotation in the CK is X, Y, Z and Z is set to 90, but in NifScope it's Y, P, R and R is -90!?!
Scale = Scale
At this point, if you plan on retexturing it is best/easiest to do it now rather than have to search through once you've added a LOT more! If using the same mesh retextured you can copy-branch/paste-branch from
one you've already imported and retextured instead of copying a brand new copy and retexturing all over again!
Continue adding each piece until your undercarriage is complete then save with a new name so as not to overwrite the stripped version in case you want to start again, got something wrong etc. etc.
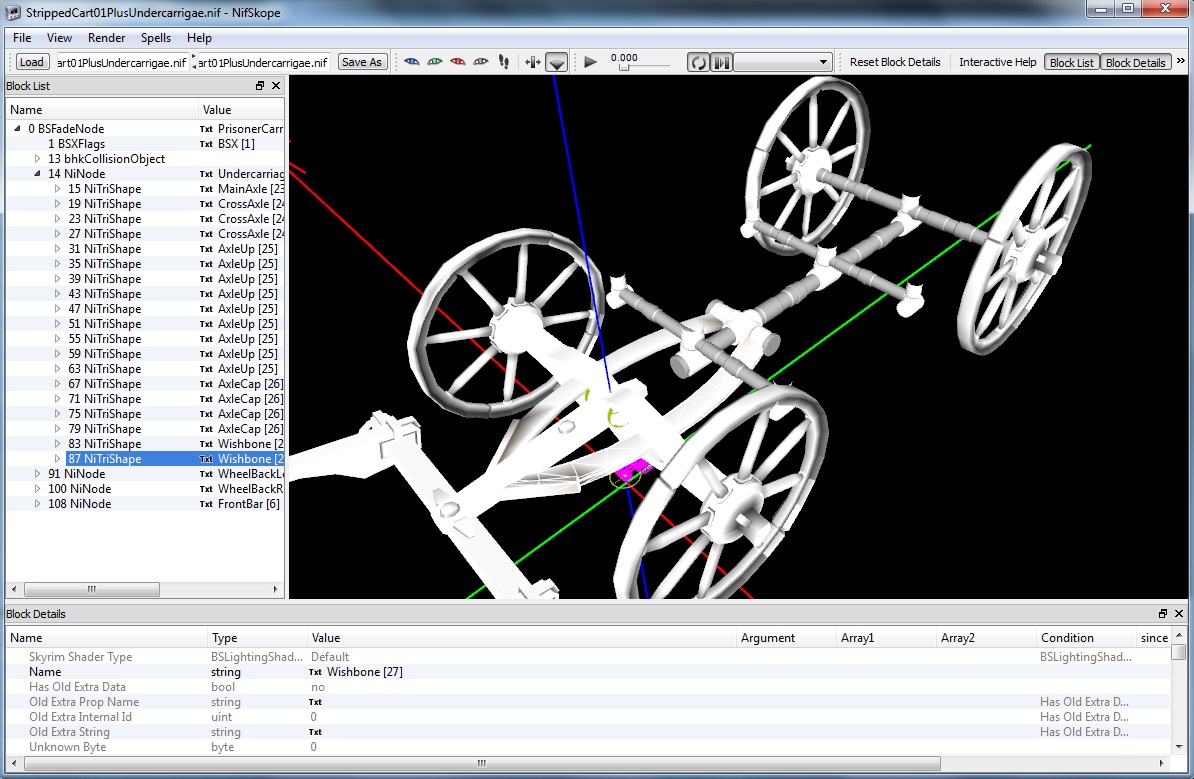
Time for a look at how things are progressing!
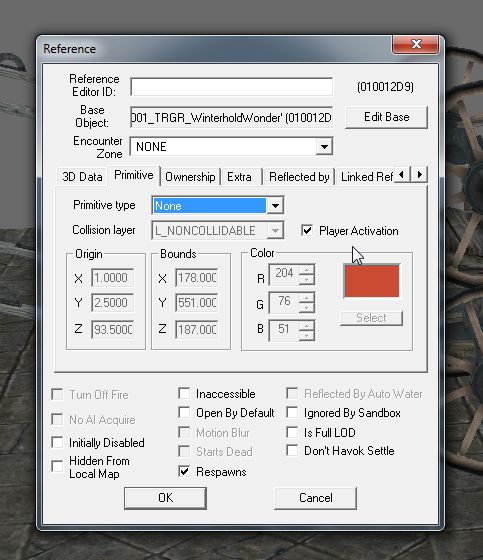
Back in the CK select the original cart sitting in the middle of your large floor, hit the cubed T button to create a new trigger/activator, give it an ID and a name (this one will be a version for Winterhold and will be a
TARDIS version for the mage's city!) and attach your new stripped cart with undercarriage to the <Model> section.
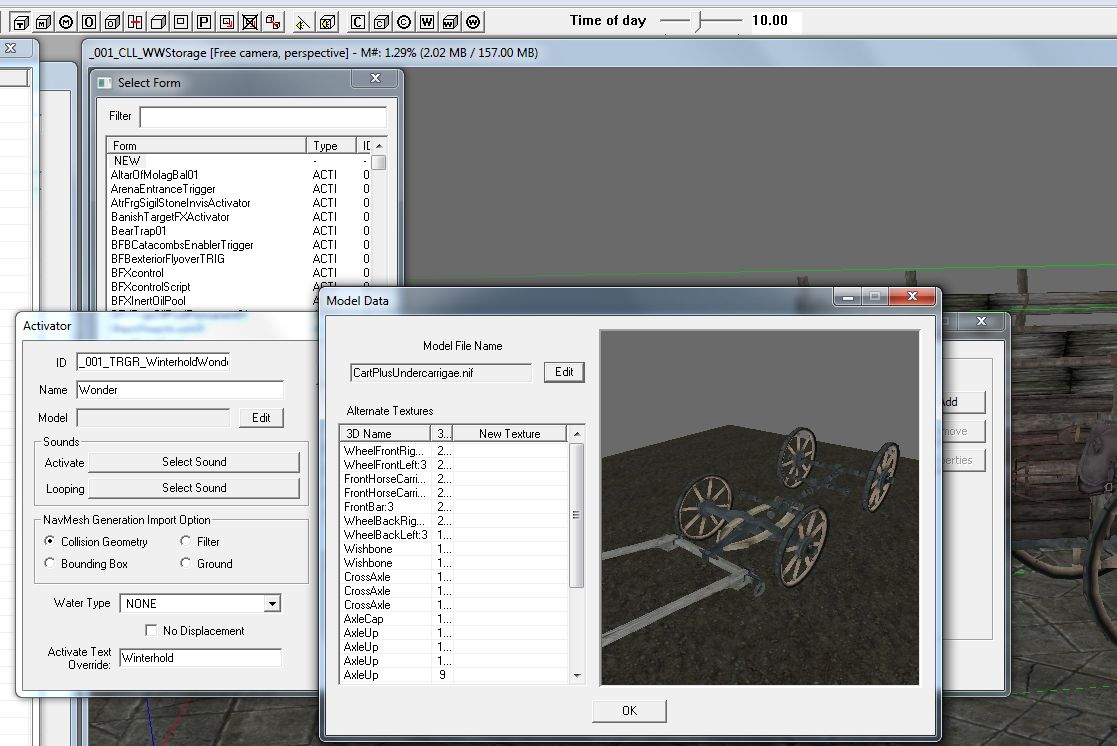
Hit OK all the way out and you'll find a standard trigger box, hit R the remove the positioning/sizing arrows then double-click it and in the <Primative> tab tick <Player Activation> and set the <Primative> drop-down box to <None>.
Now Ok out of that and hit F5 to refresh the model, I've reset it's zero's and moved the original out of the way to see clearly, as you can see I've also retextured the pieces as I went.
Download - StrippedCart01PlusUndercarriage.nif
Next, Caravans Part 3 - The Bulk Of The Body.
Part 2
Undercarriage
Ok, so you've got your caravan base but as you'll have noticed, when taking off the unwanted bits it's also removed most of the undercarriage as well, so now we need to rebuild that.
Start by making yourself a new, empty cell and drop a large floor in the very middle, set it's X, Y, Z's to 0.
Now drag the original wagon into the cell and center that as well.
Using the wagon as a base rebuild the undercarriage using parts available in the CK, I use the Dwemer pipe sets myself with their scale set to 0.1 and a couple of curved wooden beams.
Here's a quick look at the first 5 pieces with the wagon out of the way, x5 for the main axle, x3 for the cross axle and a few Pipe3Way01's for the uprights.
A good rule to follow is to export any nif's you use as you use them, these will be needed in a bit!
Once you're happy with your new undercarriage it's time to import the pieces into the stripped cart nif.
Open 2 copies of NifScope, in the first load your stripped cart nif and in the second load the first of the new pieces to be added.
Right-click the Root branch of your stripped cart (0 BSFadeNode) and click <Node>/<Attach Node>.
In the long list that appears find & click <NiNode>.
Now in the NiNodes properties click the <TXT> bit in the <Name> section.
And give it a name, this will be used as a sort of folder/holder for all the pieces that will go into making the undercarriage. This way, when the NiNode's branch is collapsed, there will only be one entry in the objects tree list
instead of every piece that goes into making up the undercarriage! We shall be using this method for all the sections of the carriage: Undercarriage, Exterior, Interior, possibly roof, objects to be moved during run-time interior & exterior etc.
You can break the build up into as many pieces as you like using this method, separate floors from walls, walls from ceiling.....This makes later editing and/or texturing a lot easier!
Now over to your new undercarriage piece, click the object in the render window to high-light the mesh object's branch, right-click the high-lighted branch and click <Block>/<Copy Branch>.
And back to your caravan and right-click your new NiNode in the tree and click <Block>/Paste Branch>.
Again, click the <TXT> in the <Name> section and give your new mesh a unique name. Only one name is needed per mesh, if you use the same mesh again and it does not get the same name click the <TXT> option
and scroll down the list to find it, select it, and hit OK.
Now scroll down a little in the objects properties and you'll find three settings all together: Translation, Rotation & Scale.
Use the values from the original in the CK to position your mesh in the correct location at the correct angle.
Nifscope CK
Translation = Position
Rotation = Rotation.......BUT, for some reason the rotation in NifScope is always reversed from that in the CK,
as you can see Rotation in the CK is X, Y, Z and Z is set to 90, but in NifScope it's Y, P, R and R is -90!?!
Scale = Scale
At this point, if you plan on retexturing it is best/easiest to do it now rather than have to search through once you've added a LOT more! If using the same mesh retextured you can copy-branch/paste-branch from
one you've already imported and retextured instead of copying a brand new copy and retexturing all over again!
Continue adding each piece until your undercarriage is complete then save with a new name so as not to overwrite the stripped version in case you want to start again, got something wrong etc. etc.
Time for a look at how things are progressing!
Back in the CK select the original cart sitting in the middle of your large floor, hit the cubed T button to create a new trigger/activator, give it an ID and a name (this one will be a version for Winterhold and will be a
TARDIS version for the mage's city!) and attach your new stripped cart with undercarriage to the <Model> section.
Hit OK all the way out and you'll find a standard trigger box, hit R the remove the positioning/sizing arrows then double-click it and in the <Primative> tab tick <Player Activation> and set the <Primative> drop-down box to <None>.
Now Ok out of that and hit F5 to refresh the model, I've reset it's zero's and moved the original out of the way to see clearly, as you can see I've also retextured the pieces as I went.
Download - StrippedCart01PlusUndercarriage.nif
Next, Caravans Part 3 - The Bulk Of The Body.