For Sale, Sold!
Selling your mod house without having to mess with the steward!
To follow this tutorial you need to have created your For Sale! sign (see Basic Retexturing Tutorial) and used it
to create a new trigger/activator (see Niffed Triggers Tutorial).
You will also need a script package called For Sale, Sold! which you can get from my nexus page:
Bert's Bits & Bobs.
This package contains 2 versions of the script, Basic & Advanced, the demo sale sign I will use in this tutorial
and the textures it uses.
This tutorial will focus on the Basic version with quick notes at the end on setting up the extras that the
Advanced version has available.
So, to begin you should have your niffed trigger sale sign in place and ready to have the script added to it.

Next, double-click the sign to open it's properties and in the <Scripts> tab click the <Add> button.

Locate _001_SCRPT_ForSale_Basic (or Advanced if that is the one you wish to use) and double-click it to load it
onto your sale sign.

Now with the script highlighted click <Properties>.

You will now be presented with a new window showing all the options to be filled.

The first thing to do is hit <Auto-Fill All>, this will fill the Gold001 setting with the gold Septim object so
the game knows what object to remove from the player when the house is bought.


Next you need to select the <Cost> setting, hit <Edit Value> at the top right of the window and enter the amount
your house will cost the player, I've gone for 5,000 Septims.

The next objects, Deed01 & 02, are book objects, these are not mandatory but it's nice to have a bit of paper
saying you own the property so you can add 2 deeds or 1 deed and a bill of sale, you get the idea.

To create a deed find yourself a nice note or book, depending on your preference, I've gone for a gilt edged note.

Now, with the note/book of your choice selected hit F2 and rename it uniquely for your house then hit Enter twice
to create a new instance of it.


Right-click your deed/bill of sale and select <Edit>.

In the new properties window start by giving your deed a unique name, this is the name that will be seen in-game.

Then scoop all the text between the font setting code,

And replace it with your own text.

Click OK to close and save your new deed then link it to the deed option(s) back in the script settings, rinse and
repeat for the second deed/bill of sale if you wish.

Next are the keys, I've supplied space for two keys in case you have a gate that has it's own key or a guardhouse
or anything else that uses a different key to the house.

As before with the deed find yourself a suitable key, hit F2 and rename then Enter twice to create your new unique
key and edit the internal name to what you wish shown in-game then link it into the script.

And finally we have three message boxes for the players interaction, head to the <Message> section of the objects
list,

Right-click in the objects pane and select <New>,

Give your message a unique ID, a message giving details of the house/cost, then right-click in the middle pane and
select <New> and in the <Item Text> type "Yes" or "Buy" or purchase or whatever then again right-click to add
another and this time insert "No" or "Cancel".
This message is the first, main menu that is presented to the player, you then need two more, one for when the
player selects "Yes" but doesn't have enough money and one for when the player does have enough, in the final you
may want to add something like "Deed & Key Added To Inventory" to let the player know he/she now has those items.
Note, the NotEnoughCash & Sold messages do not need any buttons, the game will automatically supply OK buttons!


You should now have your three messages.

Now link each of these messages into the script's settings,


And hit OK,

And OK again.

Now all thats needed is to connect your key to your door. I've plonked down a door just to demonstrate this part.
Double-click your door to open it's properties,

Go to the <Lock> tab,
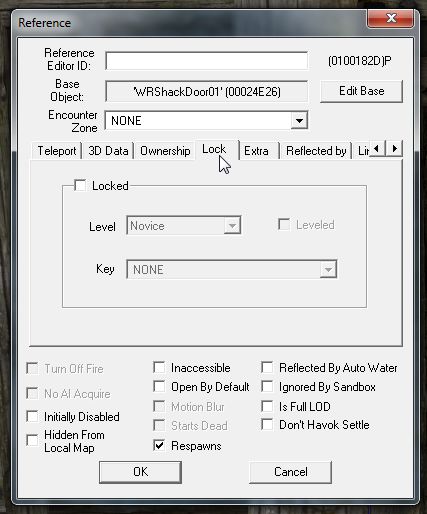
Tick <Locked>, set <Level> to <Requires Key> and in the <Key> drop-down box attach your new house key.
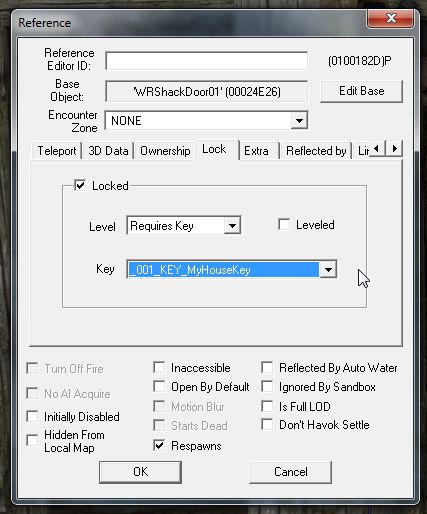
Thats it! Go in-game and try it out!
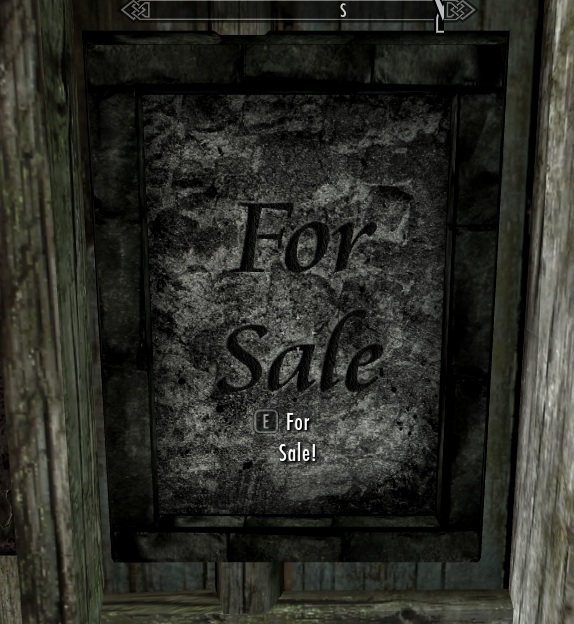
I was going to put a couple of screen grabs here to show it in action but the gosh-darned game wouldn't
grab while in the menu so here's just a shot of the sign. ;)
Tip: This tutorial so far will allow the player to purchase your property through the For Sale sign and the sign
will then disappear, a nice way to finish it is to create a second sign with the house name on it, this one as a
Static object, place it in exactly the same position as the sale sign, set it to <Initially Disabled> and set it's
<Enabled Parent> to the sale sign as <Opposite Of Parent>, this way, when the sale sign disappears the house name
sign will appear in it's place!
Now for a quick description of the Advanced version and it's setup.
When this version is used the player, on purchasing the house, will be made invisible, no collision, and pop to
third person, the player will then be taken on a panoramic circuit of the house they have just bought and replaced
back where they began.
On hitting <Auto-Fill All> you will find a few more options become filled:
IdleCartDriverSway - This sets the player into a pose that is off the ground to help stop the effect of the player
jumping all the time if they leave the ground during the circuit.
IdleCartExitInstant - This puts them back on the ground once the circuit is complete.
XMarker - This is a marker that is dropped at the players feet and denotes the final stage of the circuit to place
the player back where they began.
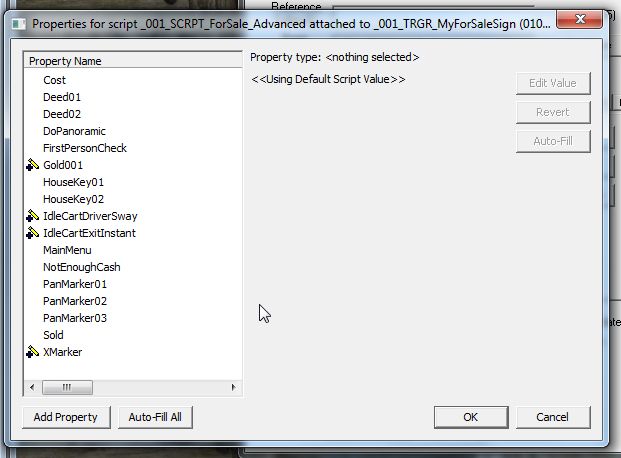
There are also five other settings to be set, firstly is the <DoPanoramic> tick box, if this is not ticked the
script will react the same as the Basic version regardless of any of the other Advanced settings being set.
Next is <FirstPersonCheck>, as the script forces the player into third person this GlobalVariable is needed to
check whether to force them back to first or third person once the circuit is complete, I recommend IsharaMeradin's
1st Person Check Tutorial for setting this Variable up then assign it to the script.
And finally there are three PanMarkers, these are XMarkers you need to place around your property in a diamond,
with the sale sign being the start/finish point, for the player to follow on his/her circuit. If you need more
markers to comfortably circuit the house without risking passing through the house itself there are position
pointers in the script for placing more PanMarkers, be sure to recompile the script under a new name if you do
this to avoid any possible conflicts. Attach each of these markers to the script in the order you want the player
to circuit the house.
To see how the advanced version works in-game check out my mod Wild Mountain Dairy Farm.
berticus0001
Selling your mod house without having to mess with the steward!
To follow this tutorial you need to have created your For Sale! sign (see Basic Retexturing Tutorial) and used it
to create a new trigger/activator (see Niffed Triggers Tutorial).
You will also need a script package called For Sale, Sold! which you can get from my nexus page:
Bert's Bits & Bobs.
This package contains 2 versions of the script, Basic & Advanced, the demo sale sign I will use in this tutorial
and the textures it uses.
This tutorial will focus on the Basic version with quick notes at the end on setting up the extras that the
Advanced version has available.
So, to begin you should have your niffed trigger sale sign in place and ready to have the script added to it.

Next, double-click the sign to open it's properties and in the <Scripts> tab click the <Add> button.

Locate _001_SCRPT_ForSale_Basic (or Advanced if that is the one you wish to use) and double-click it to load it
onto your sale sign.

Now with the script highlighted click <Properties>.

You will now be presented with a new window showing all the options to be filled.

The first thing to do is hit <Auto-Fill All>, this will fill the Gold001 setting with the gold Septim object so
the game knows what object to remove from the player when the house is bought.


Next you need to select the <Cost> setting, hit <Edit Value> at the top right of the window and enter the amount
your house will cost the player, I've gone for 5,000 Septims.

The next objects, Deed01 & 02, are book objects, these are not mandatory but it's nice to have a bit of paper
saying you own the property so you can add 2 deeds or 1 deed and a bill of sale, you get the idea.

To create a deed find yourself a nice note or book, depending on your preference, I've gone for a gilt edged note.

Now, with the note/book of your choice selected hit F2 and rename it uniquely for your house then hit Enter twice
to create a new instance of it.


Right-click your deed/bill of sale and select <Edit>.

In the new properties window start by giving your deed a unique name, this is the name that will be seen in-game.

Then scoop all the text between the font setting code,

And replace it with your own text.

Click OK to close and save your new deed then link it to the deed option(s) back in the script settings, rinse and
repeat for the second deed/bill of sale if you wish.

Next are the keys, I've supplied space for two keys in case you have a gate that has it's own key or a guardhouse
or anything else that uses a different key to the house.

As before with the deed find yourself a suitable key, hit F2 and rename then Enter twice to create your new unique
key and edit the internal name to what you wish shown in-game then link it into the script.

And finally we have three message boxes for the players interaction, head to the <Message> section of the objects
list,

Right-click in the objects pane and select <New>,

Give your message a unique ID, a message giving details of the house/cost, then right-click in the middle pane and
select <New> and in the <Item Text> type "Yes" or "Buy" or purchase or whatever then again right-click to add
another and this time insert "No" or "Cancel".
This message is the first, main menu that is presented to the player, you then need two more, one for when the
player selects "Yes" but doesn't have enough money and one for when the player does have enough, in the final you
may want to add something like "Deed & Key Added To Inventory" to let the player know he/she now has those items.
Note, the NotEnoughCash & Sold messages do not need any buttons, the game will automatically supply OK buttons!


You should now have your three messages.

Now link each of these messages into the script's settings,


And hit OK,

And OK again.

Now all thats needed is to connect your key to your door. I've plonked down a door just to demonstrate this part.
Double-click your door to open it's properties,

Go to the <Lock> tab,

Tick <Locked>, set <Level> to <Requires Key> and in the <Key> drop-down box attach your new house key.

Thats it! Go in-game and try it out!
I was going to put a couple of screen grabs here to show it in action but the gosh-darned game wouldn't
grab while in the menu so here's just a shot of the sign. ;)

Tip: This tutorial so far will allow the player to purchase your property through the For Sale sign and the sign
will then disappear, a nice way to finish it is to create a second sign with the house name on it, this one as a
Static object, place it in exactly the same position as the sale sign, set it to <Initially Disabled> and set it's
<Enabled Parent> to the sale sign as <Opposite Of Parent>, this way, when the sale sign disappears the house name
sign will appear in it's place!
Now for a quick description of the Advanced version and it's setup.
When this version is used the player, on purchasing the house, will be made invisible, no collision, and pop to
third person, the player will then be taken on a panoramic circuit of the house they have just bought and replaced
back where they began.
On hitting <Auto-Fill All> you will find a few more options become filled:
IdleCartDriverSway - This sets the player into a pose that is off the ground to help stop the effect of the player
jumping all the time if they leave the ground during the circuit.
IdleCartExitInstant - This puts them back on the ground once the circuit is complete.
XMarker - This is a marker that is dropped at the players feet and denotes the final stage of the circuit to place
the player back where they began.

There are also five other settings to be set, firstly is the <DoPanoramic> tick box, if this is not ticked the
script will react the same as the Basic version regardless of any of the other Advanced settings being set.
Next is <FirstPersonCheck>, as the script forces the player into third person this GlobalVariable is needed to
check whether to force them back to first or third person once the circuit is complete, I recommend IsharaMeradin's
1st Person Check Tutorial for setting this Variable up then assign it to the script.
And finally there are three PanMarkers, these are XMarkers you need to place around your property in a diamond,
with the sale sign being the start/finish point, for the player to follow on his/her circuit. If you need more
markers to comfortably circuit the house without risking passing through the house itself there are position
pointers in the script for placing more PanMarkers, be sure to recompile the script under a new name if you do
this to avoid any possible conflicts. Attach each of these markers to the script in the order you want the player
to circuit the house.
To see how the advanced version works in-game check out my mod Wild Mountain Dairy Farm.
berticus0001
