

How to make things appear and disappear in-game at the flick of a switch
For this tutorial I'll be making a simple shower to show you how you can turn things on and off!
To start with I have already placed a few pieces including a dwemer valve to turn the shower on and
off with, some dwemer pipes for the shower head and a rain effect for the water. Now on with setting
up the triggers.
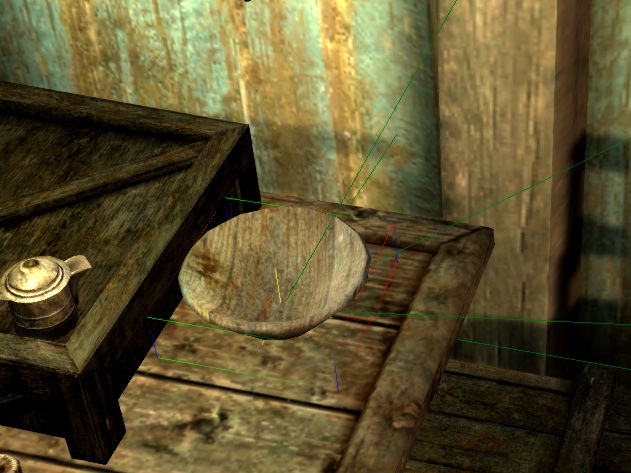
Start by selecting an object, any object will do but not something too large or it'll just get in the way, something
around bowl or melon size should be perfect!
I've gone for a bowl:
Next click the "T" cube on the toolbar to create a new trigger around the object you've selected and select <New>
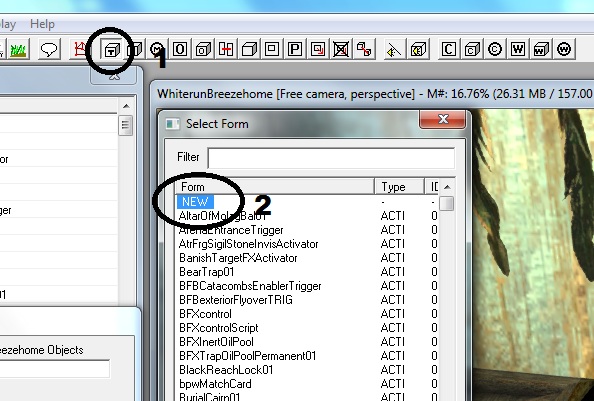
Give the new trigger a recognizable name (I always start my custom objects with "zz01" so I know all my bits will
always be together at the bottom of the lists, but you could just as easily start with zero's to be at the top!!).

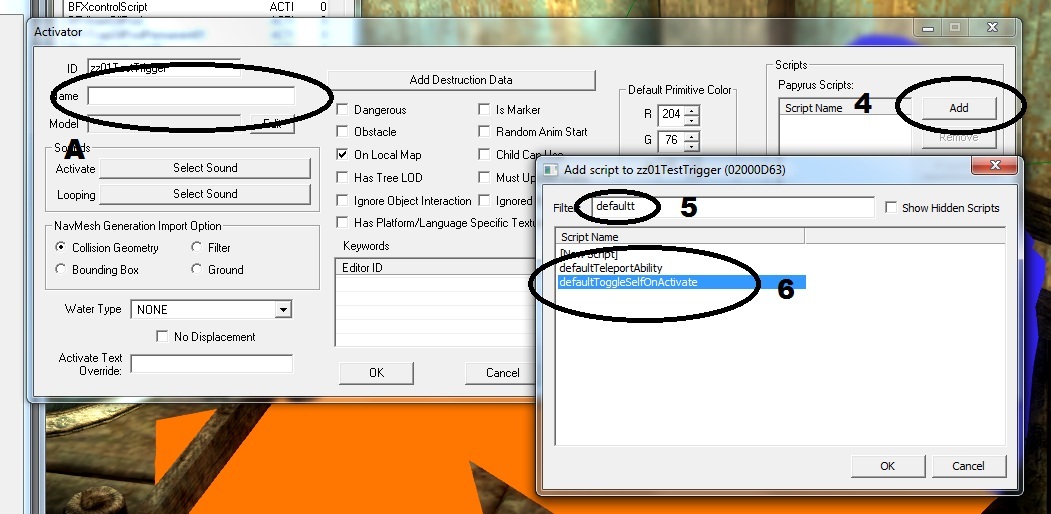
Next you will be presented with a window containing the base attributes of the trigger. "A" is where you would
put the name that people can see in-game if your creating a trigger for another object that cant necessarily be
seen, but as this trigger will be hidden you can skip it! The next thing to do is click <Add> on the scripts area
and in the filter start typing "defaultToggleSelfOnActivate". as you can see you only need to type some
of it until the script your after is plainly visible in the list. Select the toggle script and hit OK. This script means
that when the trigger is activated it will disable/enable itself, and we shall be connecting the bits we want to turn on and off to it!
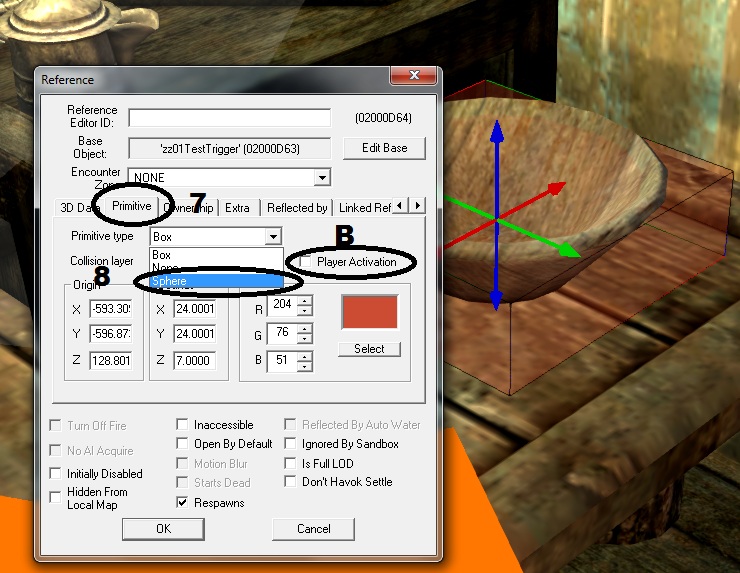
Once the script is in hit OK and you now have a cube with pointy arrows which can be used to resize it if you wish,
but the bowl is a good size and when we turn it into a sphere it will be rounded at it's largest cross section. So hit "E"
on your keyboard twice to get rid of the arrows so you can move it around. Now double click it to open the "Reference"
properties of this trigger, go to the <Primitive> tab and in the drop-down box select sphere (for some reason the ck has a
problem with too many cube triggers and they stop working, but sphere's always work!). The "B" around the
<Player Activation> you would tick if it was for the player to interact with. This one isn't so we wont!
Now that your trigger is a sphere you can hit "OK"
Now you've got your trigger, move it close to the things it will control so you don't have to mess about too much
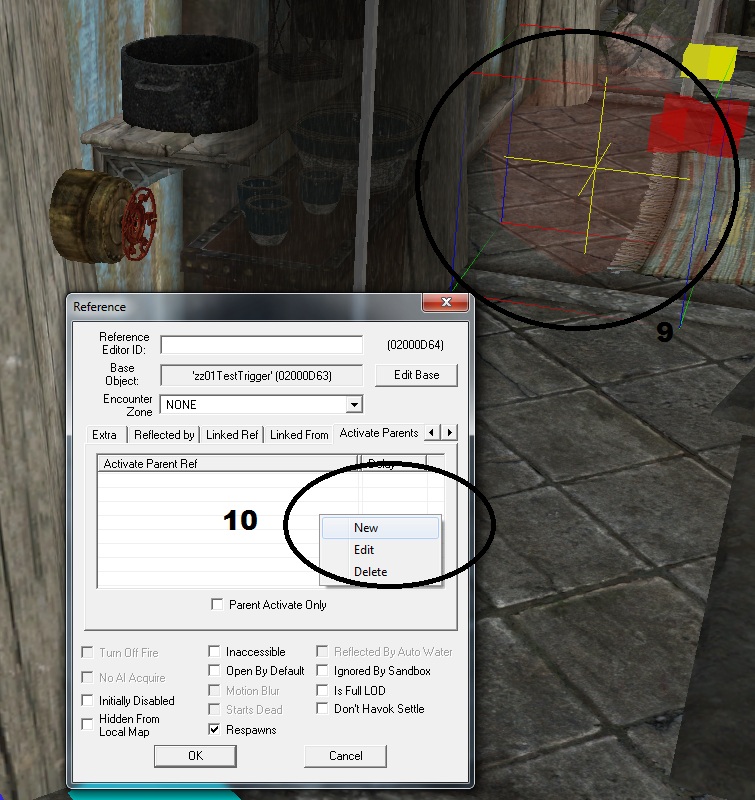
with the camera angle and double click it again and this time go to the <Activate Parents> tab, right click in the listing area
and select <New>.
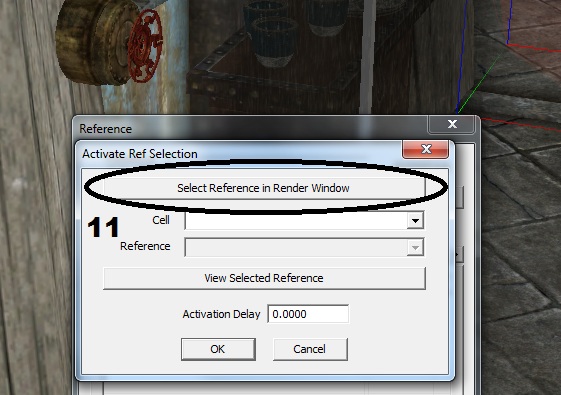
This will open a new form where you should click <Select Reference in Render Window>. you will now have a target
instead of your normal mouse cursor (didn't show up in the screencap!), now double click the target on the dwemer valve and it will
grab the required info and place it in the correct places!

Hit OK a couple of times to close those windows and double click the rain (or whatever else you are using) one at a time
that you want to turn on and off, go to the <Enable Parent> tab and hit the <Select Reference in Render window> button
and with your target cursor double click the trigger sphere. You can either tick the "Set Enable State to Opposite of Parent"
on every object that you attach to the trigger or go back into the trigger and set it to "Initially Disabled" (probably easier!)!

Once you've linked all the effects to the trigger try it out in-game! You'll probably have some bits turning on when they
should turn off or vice-versa (I know I do all the time!! lol) depending on the complexity or your project, in which case you just
find the one(s) that aren't playing right and switch the enable state thingy at 15 the other way!
All Done!!!
For this tutorial I'll be making a simple shower to show you how you can turn things on and off!
To start with I have already placed a few pieces including a dwemer valve to turn the shower on and
off with, some dwemer pipes for the shower head and a rain effect for the water. Now on with setting
up the triggers.
Start by selecting an object, any object will do but not something too large or it'll just get in the way, something
around bowl or melon size should be perfect!
I've gone for a bowl:
Next click the "T" cube on the toolbar to create a new trigger around the object you've selected and select <New>
Give the new trigger a recognizable name (I always start my custom objects with "zz01" so I know all my bits will
always be together at the bottom of the lists, but you could just as easily start with zero's to be at the top!!).
Next you will be presented with a window containing the base attributes of the trigger. "A" is where you would
put the name that people can see in-game if your creating a trigger for another object that cant necessarily be
seen, but as this trigger will be hidden you can skip it! The next thing to do is click <Add> on the scripts area
and in the filter start typing "defaultToggleSelfOnActivate". as you can see you only need to type some
of it until the script your after is plainly visible in the list. Select the toggle script and hit OK. This script means
that when the trigger is activated it will disable/enable itself, and we shall be connecting the bits we want to turn on and off to it!
Once the script is in hit OK and you now have a cube with pointy arrows which can be used to resize it if you wish,
but the bowl is a good size and when we turn it into a sphere it will be rounded at it's largest cross section. So hit "E"
on your keyboard twice to get rid of the arrows so you can move it around. Now double click it to open the "Reference"
properties of this trigger, go to the <Primitive> tab and in the drop-down box select sphere (for some reason the ck has a
problem with too many cube triggers and they stop working, but sphere's always work!). The "B" around the
<Player Activation> you would tick if it was for the player to interact with. This one isn't so we wont!
Now that your trigger is a sphere you can hit "OK"
Now you've got your trigger, move it close to the things it will control so you don't have to mess about too much
with the camera angle and double click it again and this time go to the <Activate Parents> tab, right click in the listing area
and select <New>.
This will open a new form where you should click <Select Reference in Render Window>. you will now have a target
instead of your normal mouse cursor (didn't show up in the screencap!), now double click the target on the dwemer valve and it will
grab the required info and place it in the correct places!
Hit OK a couple of times to close those windows and double click the rain (or whatever else you are using) one at a time
that you want to turn on and off, go to the <Enable Parent> tab and hit the <Select Reference in Render window> button
and with your target cursor double click the trigger sphere. You can either tick the "Set Enable State to Opposite of Parent"
on every object that you attach to the trigger or go back into the trigger and set it to "Initially Disabled" (probably easier!)!
Once you've linked all the effects to the trigger try it out in-game! You'll probably have some bits turning on when they
should turn off or vice-versa (I know I do all the time!! lol) depending on the complexity or your project, in which case you just
find the one(s) that aren't playing right and switch the enable state thingy at 15 the other way!
All Done!!!