Niffed Triggers
Edit: Slight change to the final 2 settings should be noted, both should be INVALID.
Images Updated.
Ever created a trigger over an object only to find that it seems to be about 5 times larger in-game?
Ever put a trigger somewhere only for it to get in the way of the things behind it?
Ever though, "Wouldn't it be great if I could just use the object as the trigger instead of having the two separate?"
Well, you can!!
In this tutorial I'll be showing you how to create a trigger that is the object!
To start with I should explain that this tutorial will be in 2 parts, this is because if you want to use something that can
be picked up/moved/kicked, this will still be the a case unless a few settings are changed in the objects .nif first.
This includes bottles, coins, fruit & veg weapons & armour, pottery, you get the drift. Basically anything that can be moved.
The second part will be the actual making of the trigger, so if you are using an object that is already static in the game
you can just skip straight to there!
To follow this tutorial you'll need a couple of extra bits of software as well as the CK.
Firstly you will need something to unpack the .bsa archives from the game, I use BSAOpt myself.
Second, you will need NIFScope.
I will not be going through the usage of BSAOpt as you may be using something else and they tend to have fairly decent
instructions with them anyway, and only touching upon the needed parts for NIFScope.
Part 1: Creating your static .nif
OK, to start with your going to need to do a couple of things, firstly using your software of choice unpack the
"Skyrim - Meshes.bsa" to a new folder, preferably away from your Skyrim installation. Second, in the CK, find the object
you want to use and edit it's base object to find the name of the .nif the object uses.
Now create a new folder in your "Skyrim\Data" folder called "meshes" if you don't already have one, and in there create
another folder for your .nifs. This folder will have to be packaged with your mod, using the appropriate file structure or
using the CK's packaging option to archive it in your own .bsa which must be named exactly the same as the esp/esm of your mod!
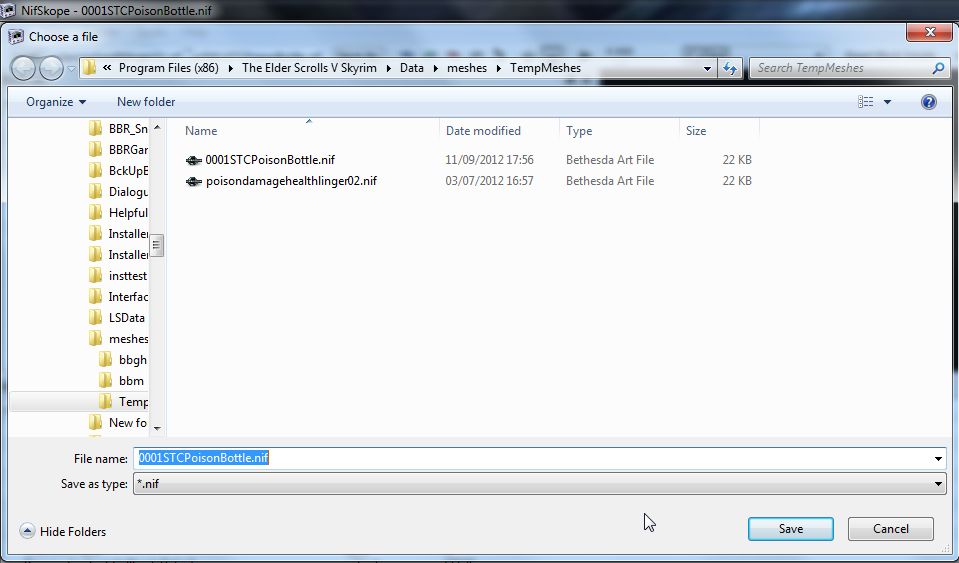
Now find that .nf in the unpacked folder and copy/paste it to your new folder in "Skyrim\Data\meshes" and rename the .nif to
something that you'll recognize and once done we'll continue with changing it's settings in NIFScope.
You should now have your .nif and your folder structure all set up, so we'll begin.
Open NIFScope, click the <Load> button in the top left corner, browse to your .nif and double-click it to load it into the window.
I'm using one of the standard Poison bottles for this tutorial, but you can choose anything you like!
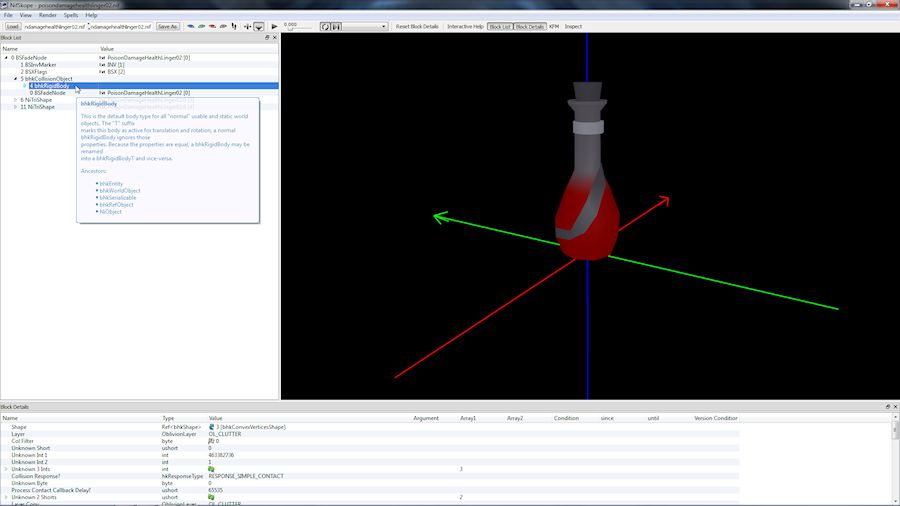
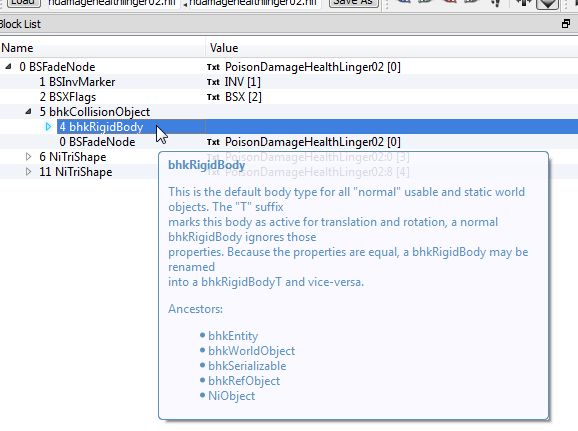
Browse the structure tree in the left panel until you find "bhkRigidBody" and select it.
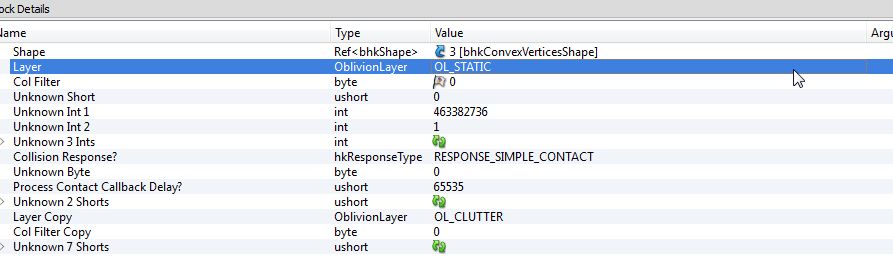
Now in the lower pane there are about 5 different settings that need to be changed, starting with <Layer>, change from OL_CLUTTER
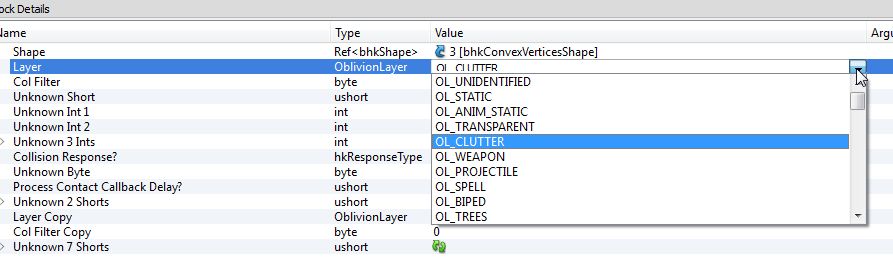
to OL_STATIC
Next, <Collision Response?> from RESPONSE_SIMPLE_CONTACT
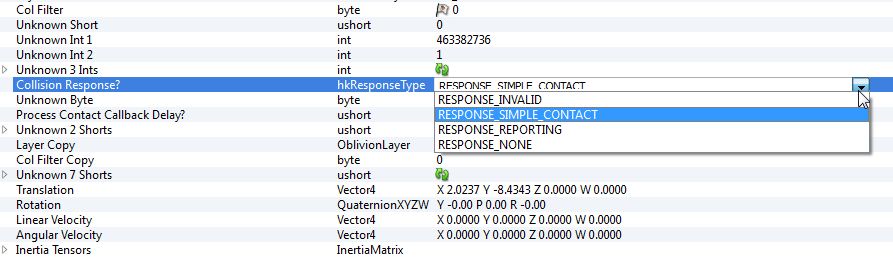
to RESPONSE_NONE
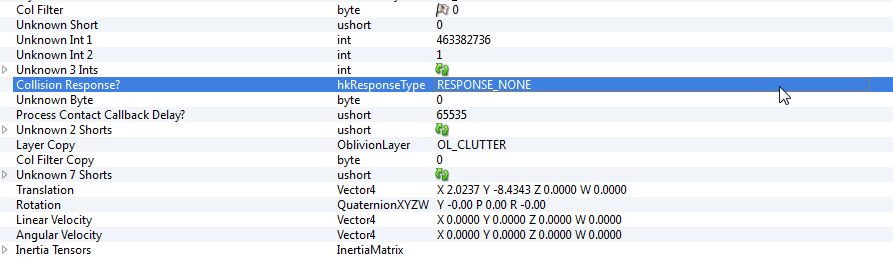
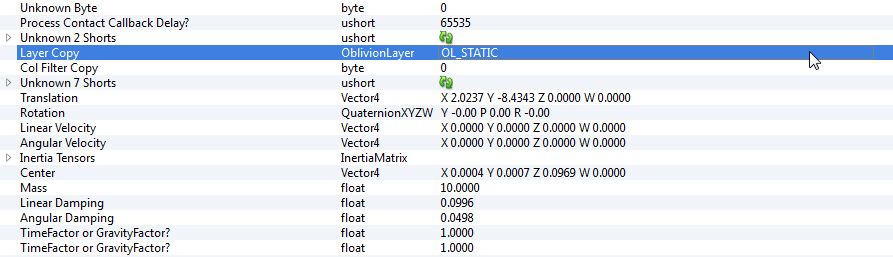
<Layer Copy> from OL_CLUTTER
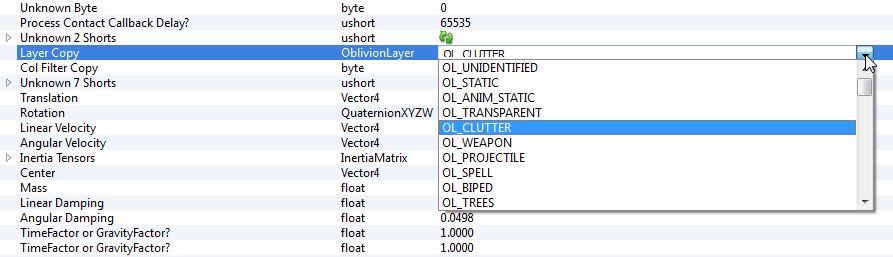
to OL_STATIC
<Motion System> from MO_SYS_SPHERE_INERTIA
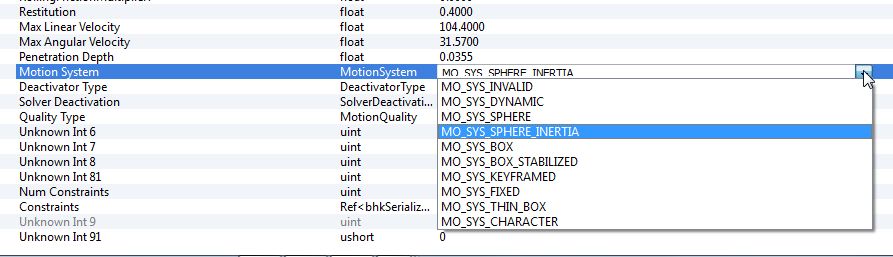
to MO_SYS_INVALID

And finally, <Quality Type> from MO_QUAL_MOVING
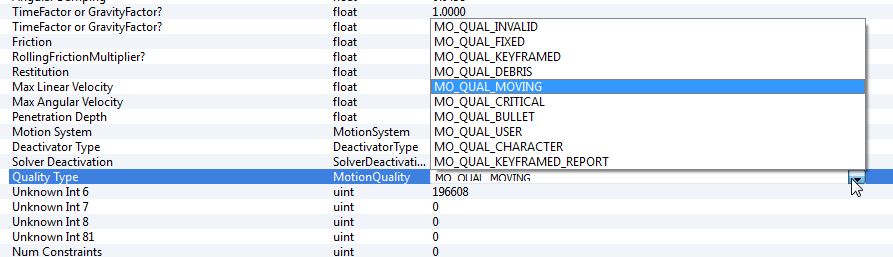
to MO_QUAL_INVALID

You can now save your edited .nif.
Your .nif is now ready to be imported back into the CK.
Part 2: Applying a .nif to a trigger
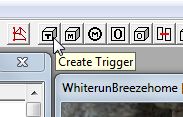
Open your mod in the CK and start by making a new trigger by clicking the cubed "T" button on the toolbar.
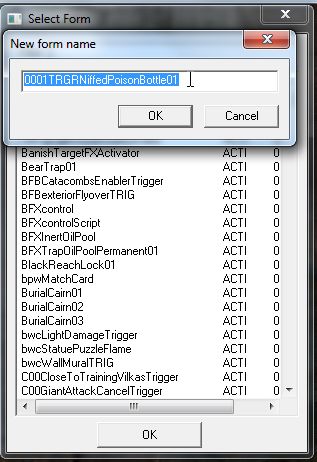
In the <Select Form> window that pops up double click <NEW>.
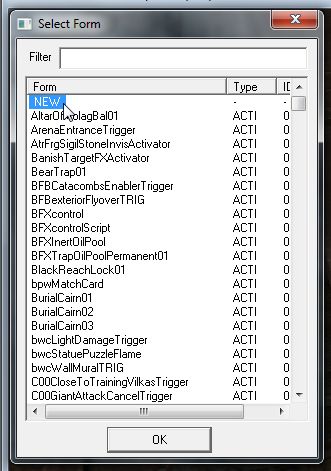
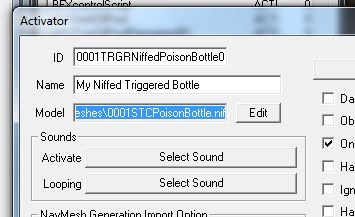
Give your new trigger a recognizable ID.
In the new <Activator> window give your trigger a name (this will be what you see when you mouse over the object in-game), and click <Edit>.
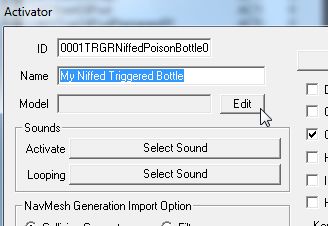
In the new <Model Data> window click <Edit> again.
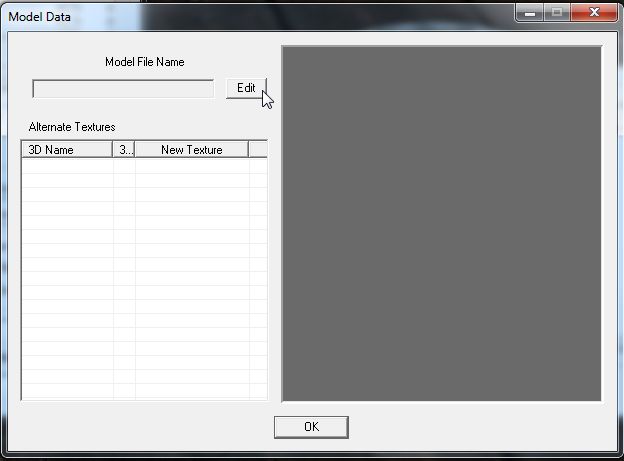
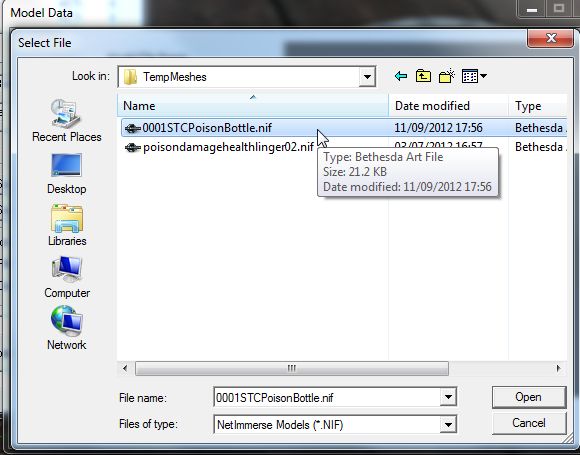
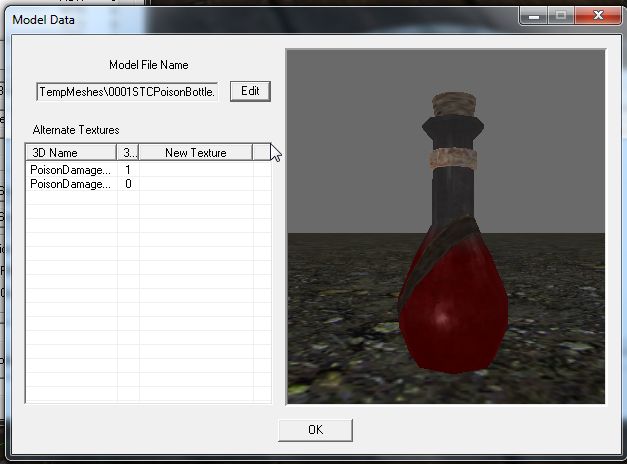
Now browse to your custom .nif's folder and double-click it to import it into the <Model Data> window and hit OK all the way out.
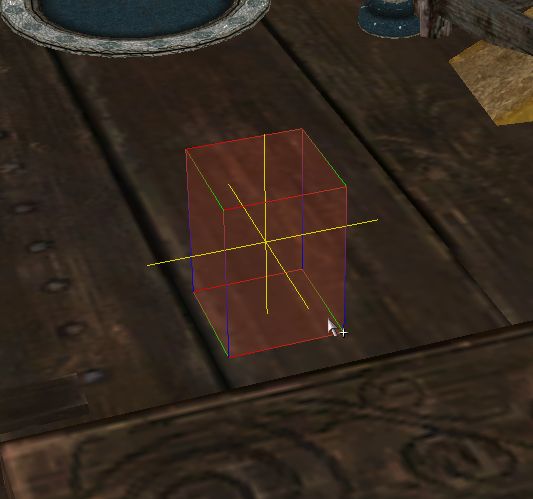
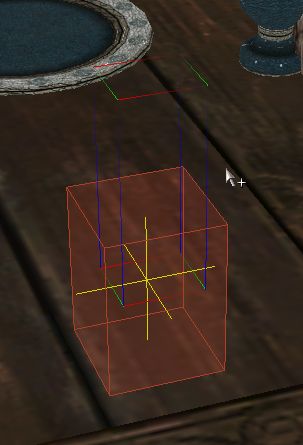
You will now have a standard trigger box and be wondering where you object is! Double-click the trigger and in the <Primitive> tab tick
<Player Activation> and in the <Primitive Type> drop-down box select <None>. Do not close the window once you have changed to <None> without
ticking the trigger <Player Activation> setting as once the .nif is being used you lose the <Primitive> tab.
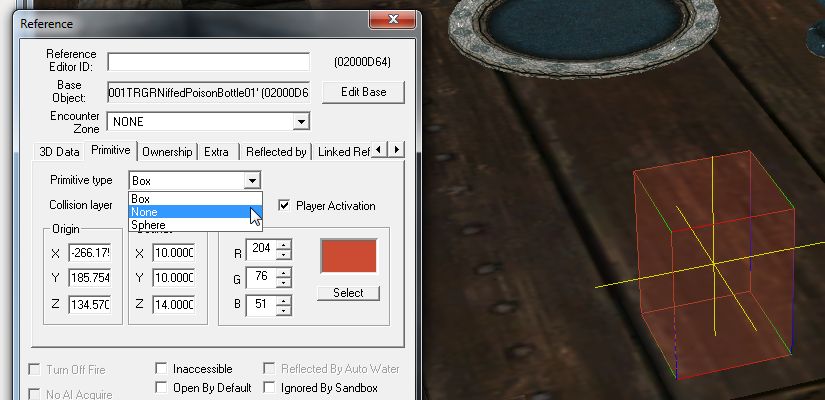
The moment you select <None> your trigger will turn into the object you have chosen, click OK.
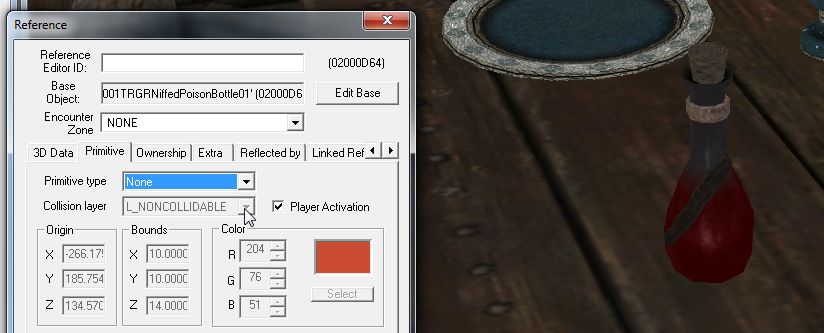
You'll see your trigger has turned back into a trigger, but now it has an invisible box with it as well.
Click your middle-mouse (scroll button) in the render window to make it active and hit F5 to refresh the window, et viola.
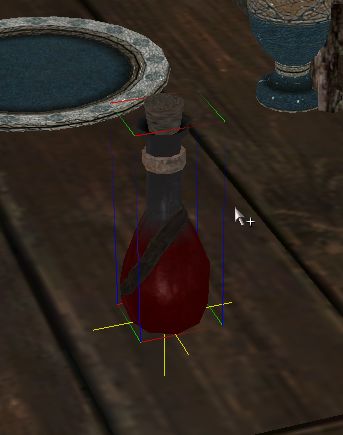
You can now add whatever scripts you wish to use to the bottle and try it out in-game.
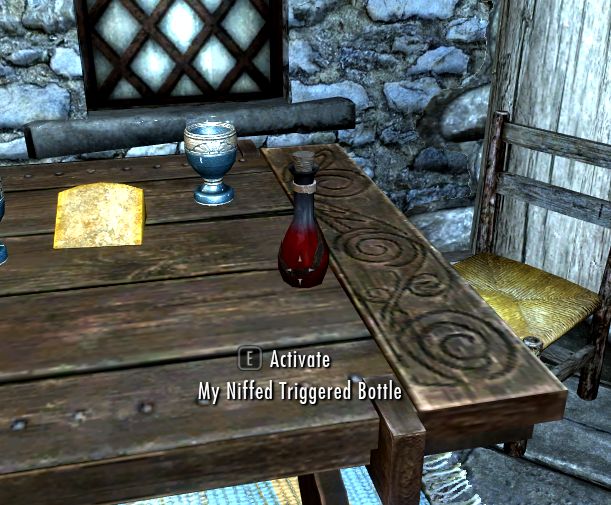
All done!! One niffed trigger!
Edit: Slight change to the final 2 settings should be noted, both should be INVALID.
Images Updated.
Ever created a trigger over an object only to find that it seems to be about 5 times larger in-game?
Ever put a trigger somewhere only for it to get in the way of the things behind it?
Ever though, "Wouldn't it be great if I could just use the object as the trigger instead of having the two separate?"
Well, you can!!
In this tutorial I'll be showing you how to create a trigger that is the object!
To start with I should explain that this tutorial will be in 2 parts, this is because if you want to use something that can
be picked up/moved/kicked, this will still be the a case unless a few settings are changed in the objects .nif first.
This includes bottles, coins, fruit & veg weapons & armour, pottery, you get the drift. Basically anything that can be moved.
The second part will be the actual making of the trigger, so if you are using an object that is already static in the game
you can just skip straight to there!
To follow this tutorial you'll need a couple of extra bits of software as well as the CK.
Firstly you will need something to unpack the .bsa archives from the game, I use BSAOpt myself.
Second, you will need NIFScope.
I will not be going through the usage of BSAOpt as you may be using something else and they tend to have fairly decent
instructions with them anyway, and only touching upon the needed parts for NIFScope.
Part 1: Creating your static .nif
OK, to start with your going to need to do a couple of things, firstly using your software of choice unpack the
"Skyrim - Meshes.bsa" to a new folder, preferably away from your Skyrim installation. Second, in the CK, find the object
you want to use and edit it's base object to find the name of the .nif the object uses.
Now create a new folder in your "Skyrim\Data" folder called "meshes" if you don't already have one, and in there create
another folder for your .nifs. This folder will have to be packaged with your mod, using the appropriate file structure or
using the CK's packaging option to archive it in your own .bsa which must be named exactly the same as the esp/esm of your mod!
Now find that .nf in the unpacked folder and copy/paste it to your new folder in "Skyrim\Data\meshes" and rename the .nif to
something that you'll recognize and once done we'll continue with changing it's settings in NIFScope.
You should now have your .nif and your folder structure all set up, so we'll begin.
Open NIFScope, click the <Load> button in the top left corner, browse to your .nif and double-click it to load it into the window.
I'm using one of the standard Poison bottles for this tutorial, but you can choose anything you like!
Browse the structure tree in the left panel until you find "bhkRigidBody" and select it.
Now in the lower pane there are about 5 different settings that need to be changed, starting with <Layer>, change from OL_CLUTTER
to OL_STATIC
Next, <Collision Response?> from RESPONSE_SIMPLE_CONTACT
to RESPONSE_NONE
<Layer Copy> from OL_CLUTTER
to OL_STATIC
<Motion System> from MO_SYS_SPHERE_INERTIA
to MO_SYS_INVALID
And finally, <Quality Type> from MO_QUAL_MOVING
to MO_QUAL_INVALID
You can now save your edited .nif.
Your .nif is now ready to be imported back into the CK.
Part 2: Applying a .nif to a trigger
Open your mod in the CK and start by making a new trigger by clicking the cubed "T" button on the toolbar.
In the <Select Form> window that pops up double click <NEW>.
Give your new trigger a recognizable ID.
In the new <Activator> window give your trigger a name (this will be what you see when you mouse over the object in-game), and click <Edit>.
In the new <Model Data> window click <Edit> again.
Now browse to your custom .nif's folder and double-click it to import it into the <Model Data> window and hit OK all the way out.
You will now have a standard trigger box and be wondering where you object is! Double-click the trigger and in the <Primitive> tab tick
<Player Activation> and in the <Primitive Type> drop-down box select <None>. Do not close the window once you have changed to <None> without
ticking the trigger <Player Activation> setting as once the .nif is being used you lose the <Primitive> tab.
The moment you select <None> your trigger will turn into the object you have chosen, click OK.
You'll see your trigger has turned back into a trigger, but now it has an invisible box with it as well.
Click your middle-mouse (scroll button) in the render window to make it active and hit F5 to refresh the window, et viola.
You can now add whatever scripts you wish to use to the bottle and try it out in-game.
All done!! One niffed trigger!