
Basic Retexturing
This tutorial is to show how to retexture standard objects in the game, this is not aimed at weapons or armour
though could be seen as a stepping stone towards that!
To start with you'll need more than just the CK, other software needed include:
FallOut Mod Manager
or
BSAOpt
For unpacking the game BSA files.
NifScope
Sage Thumbs
DDS Converter 2
Gimp 2
I also use PaintShop Pro for graphical editing but whatever graphics package you're familiar with should do
just as well.
Gimp also requires two DDS converter plugins (Info from Clintster via gentester):
Normal maps plug in from
http://code.google.com/p/gimp-normalmap/downloads/list
Download: gimp-normalmap-win32-1.2.2.zip or whichever is the most recent.
When the download is complete just do this to install:
Extract the normalmap.exe to the following directory: C:\Program Files\GIMP-2.0\lib\gimp\2.0\plug-ins
(For people on computers with "Program Files (x86)" it might be in there instead)
Extract the three .dll files to the following directory: C:\Program Files\GIMP-2.0\bin
(Same as before for those who are in the x86)
And
DDS plug in for Gimp
http://code.google.com/p/gimp-dds/downloads/list
You want the win32-2 etc etc etc, or whichever is most recent
Save the file to your desktop.
Navigate to "Local Disk C:" then "Program Files" or Program Files X86" if you have a 64 bits operating system.
Go to "GIMP-2.0," then "lib," then "gimp," then "2.0," and finally "plug-ins."
Double click on the " gimp-dds-win32-2.0.9.zip" file you downloaded and drag and drop the "dds.exe" file to the
"plug-ins" folder.
Ok, you've got your software installed and it's time to start!
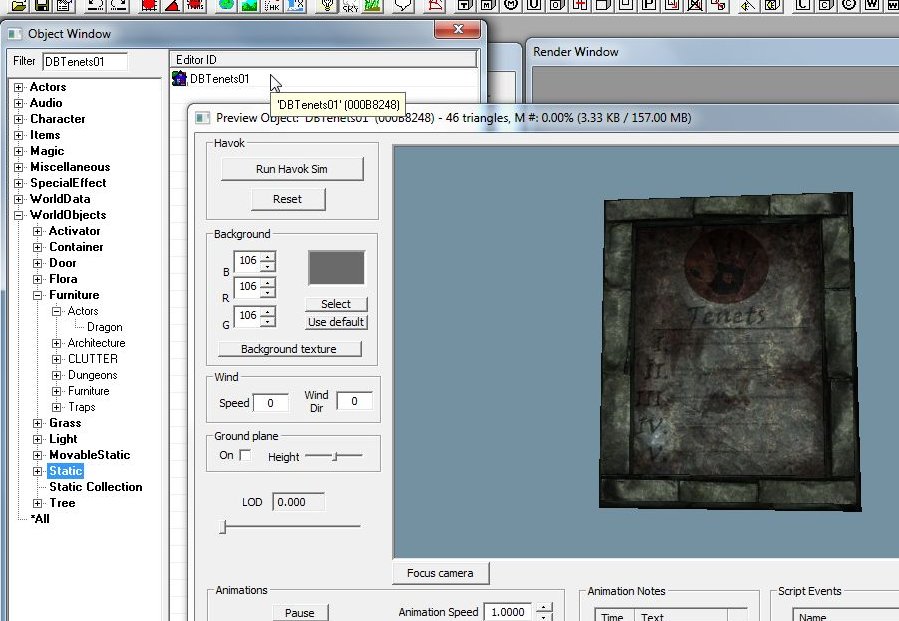
The first thing you'll need to do is decide what you'll be retexturing! For this tutorial I'll be retexturing
DBTenets01 into a For Sale sign as I'll be using that in my next tutorial, For Sale, Sold!
Start by finding your object in the ck.
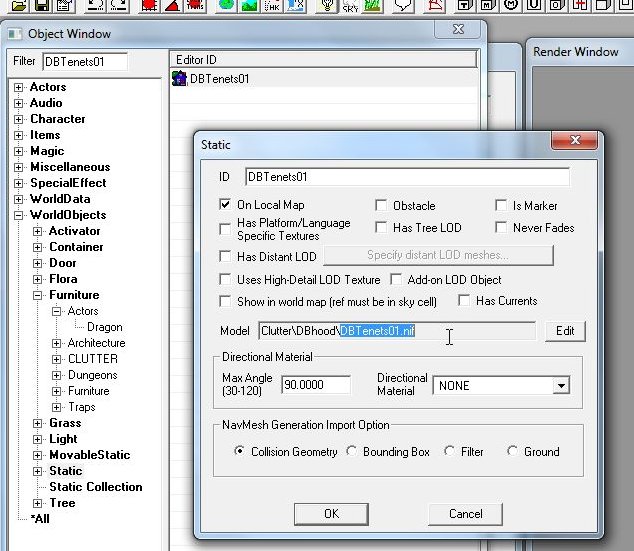
Now right-click and Edit your object and locate the name of the .nif which you'll need to export from the games
.bsa files.
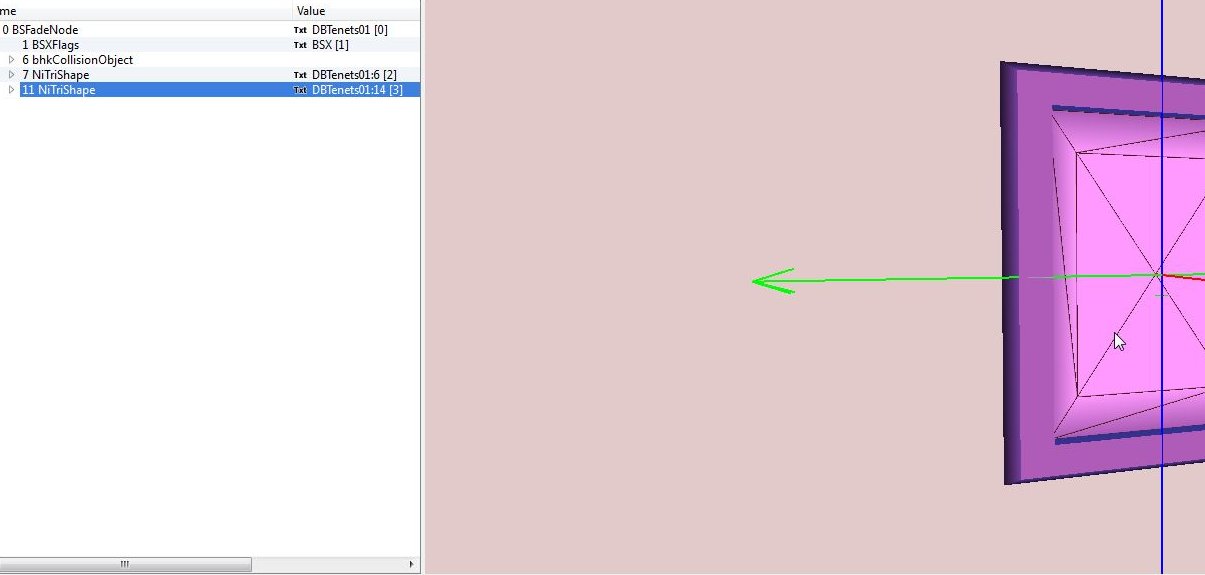
Now load NifScope and open the .nif you exported. Depending on the object you are editing you may find that it
is made up from one or more than one mesh, clicking on any part of the object will show you the lines of the
polygons that make up the mesh, if only part of the object gets lines it means the object is made from multiple
meshes.
Also, depending on how a multi-mesh object is built, it may use one texture for all meshes or it may use one
texture per mesh.
As you can see, the object I'm using has more than one mesh but as i'll only be changing the center I only need
to worry about one texture.
Note that when I selected the mesh I want to edit NifScope automatically selected that mesh object in the object
tree to the left.
Open the highlighted branch all the way then in the lower pane open the <Textures> branch to see the textures
applied to this particular mesh.
More often than not you'll find at least two textures in the list, in this case DBTenets01.dds & DBTenets01_n.dds.
The "_n" denotes that this texture is a "Normal Map", often also referred to as a "Bump Map" or an "AV Map". These
"Maps" simulate the 3d effect of textures on an object to give it a feeling/look of depth.
The normal map can be ignored as we'll be making a new one for the new texture.
Locate and export the first .dds texture from the game .bsa files, we'll use this as a base guide-line for our new
texture.

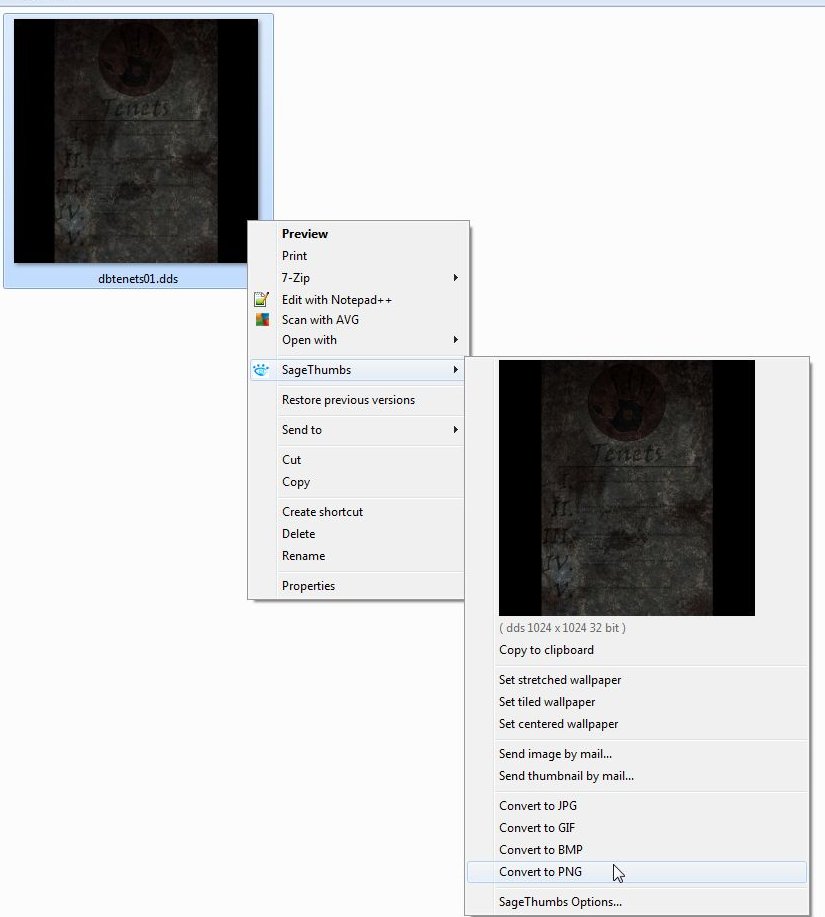
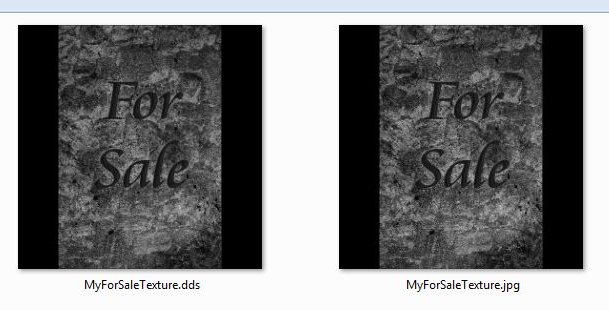
Once exported, right-click your texture and in the Sage Thumbs context menu select "Convert to PNG".
PNG is a preference of mine as I feel it keeps more quality from the original though as I'll be completely replacing
the "used" part it would not matter either way whether it was PNG, JPG or anything else.
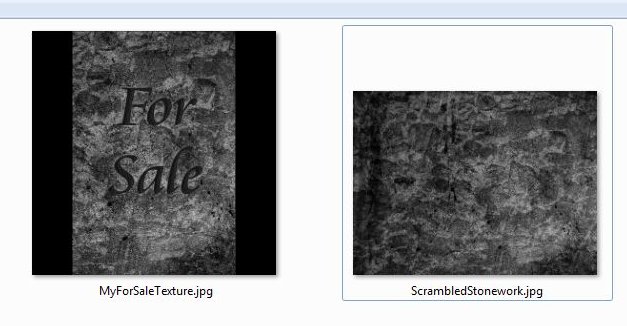
At this point it's up to you to edit the texture any way you like. As that could mean anything I won't take you
step-by-step through my changes and we'll just skip forwards to the end result, as you can see I've gone for a nice
granite texture, carved my for sale text into it and given it a recognizable name.
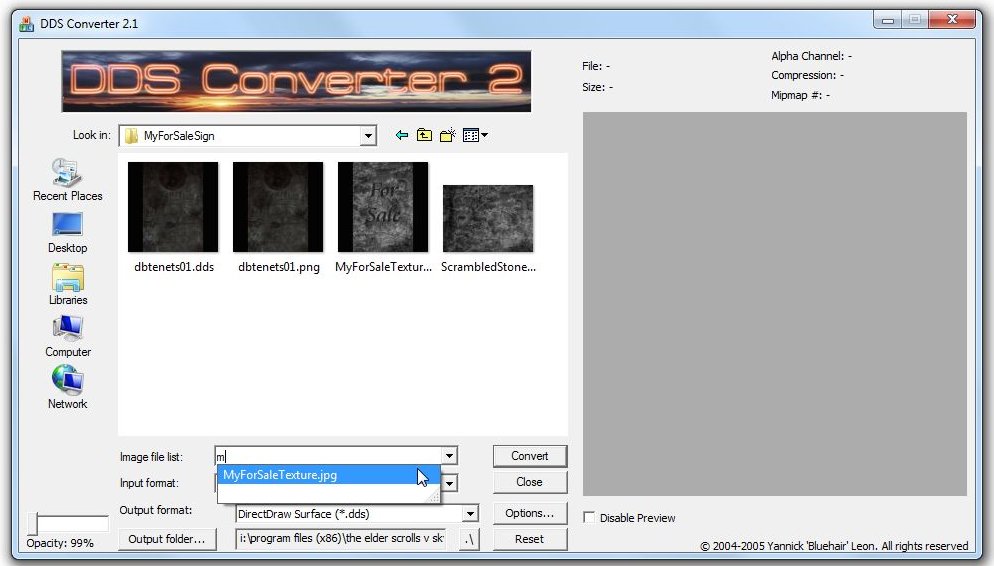
The next step is to convert your texture into a .dds format the game can use.
Open DDS Converter and navigate to the folder that holds your texture, type the first letter of your texture's name
into the <Image file list> box then select your image from the drop-down list that appears.
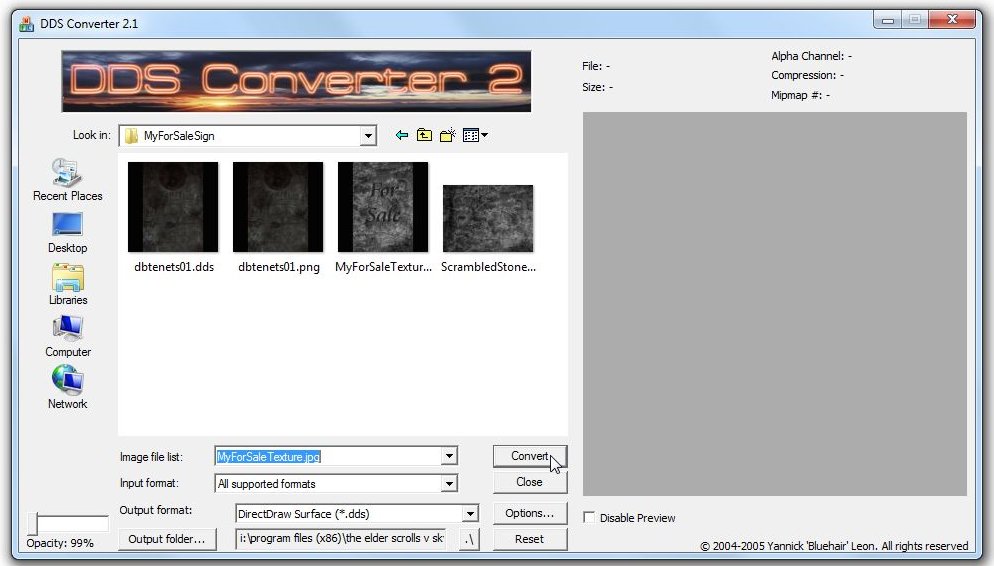
Now click the <./> button at the bottom to set the current folder as the conversion output folder,

and then click <Convert>. Your new .dds texture is then rendered to the same folder as the original.
Click <Close> when prompted.
Next up we'll create the "Normal" or "Bump" map. Open Gimp and open your new .dds file, when loaded select <Colors>
from the menu bar and click <Desaturate>,
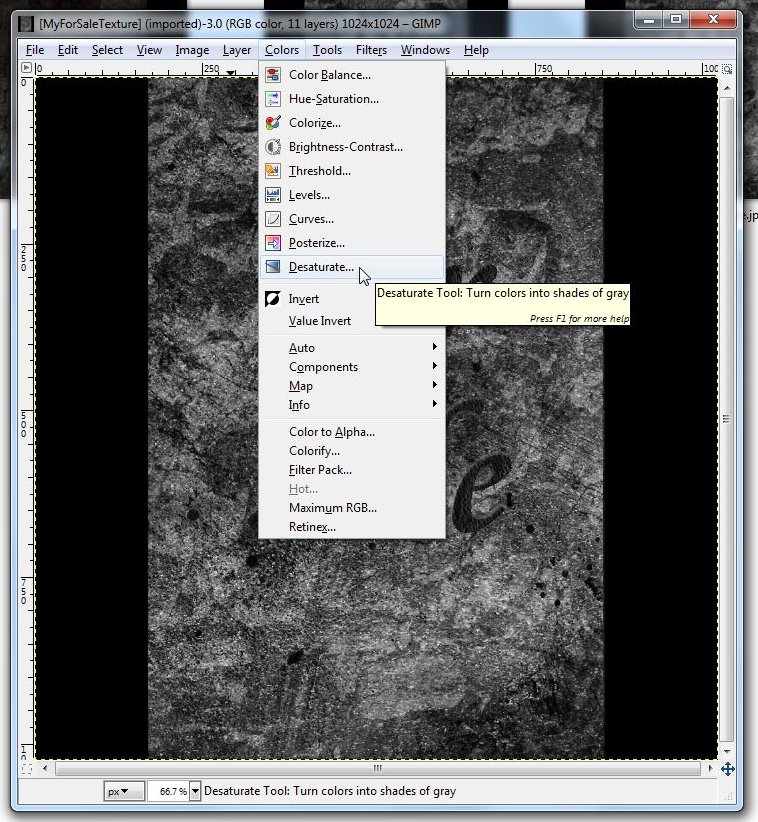
then in the new window that opens select <Lightness> & tick <Preview> if they are not already selected.
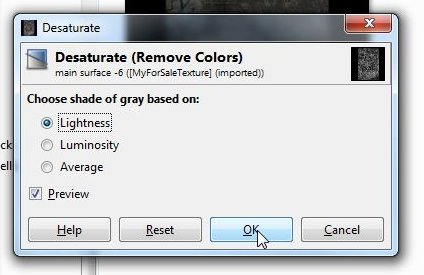
This will turn your image black & white, as mine already is almost no difference is made.
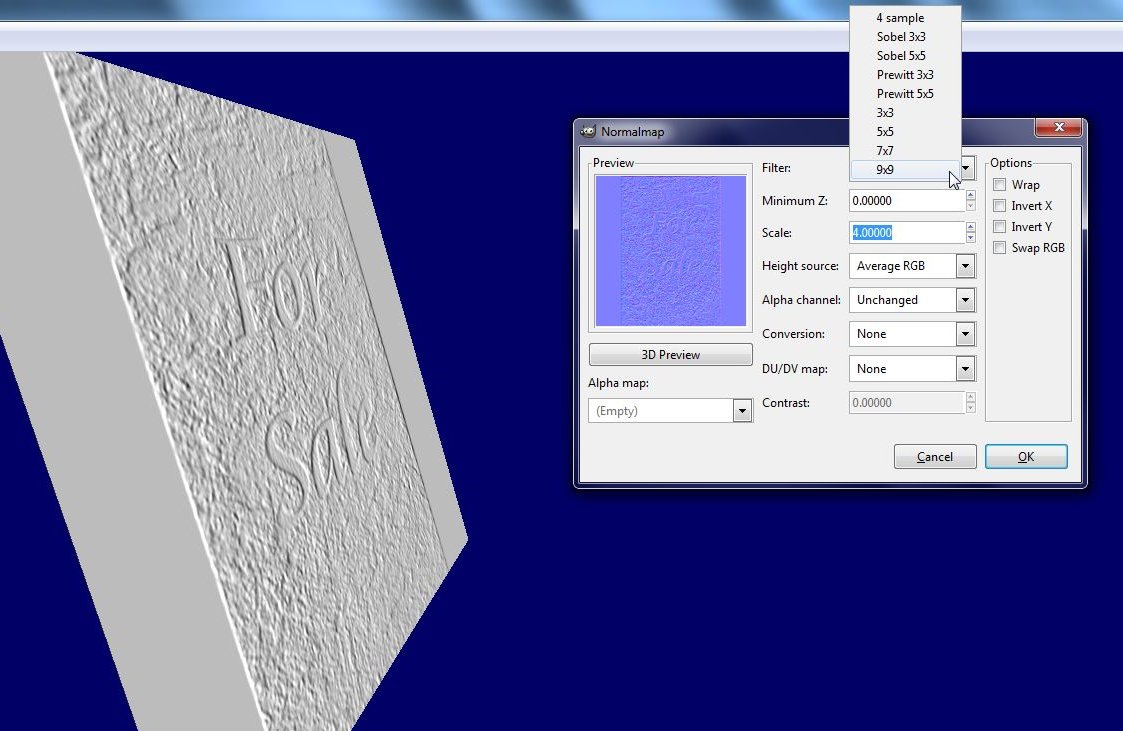
Now select <Filters> from the menu bar and click <Map> then <Normalmap>.
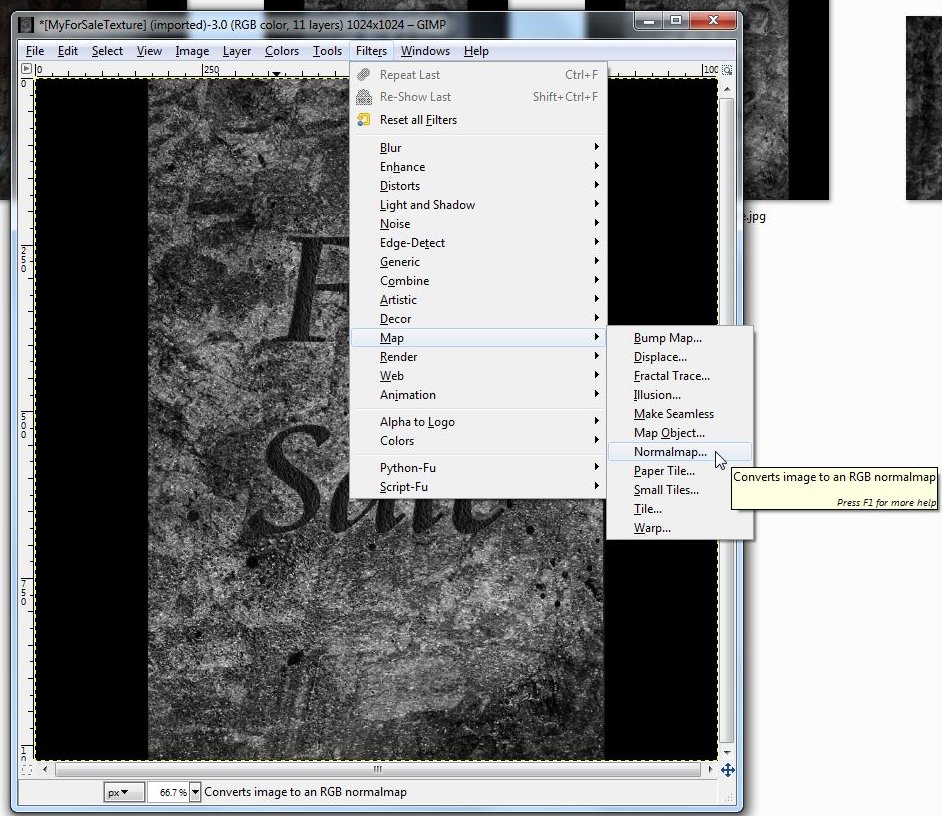
When the Normalmap window opens you'll see an almost flawless blue square, below this is a <Preview> button, hit this
and maximize the preview window that opens in the background, you may need to move the Normalmap window aside as it
can get in the way a bit.
In the preview window you'll see a white plane, you can rotate this by holding left-click and pulling the mouse,
rotate the plane so you get the best contrast.
Now to set the depth of your normal map you can change two options, <Filter> & <Scale>. I've gone for a <Filter> of
9x9 and a <Scale> of 4.0000, this will give my texture a fairly deep 3d feel, you can play with those controls 'till
you feel you have a depth that is right for the type of object you are editing.
Once you're happy with the depth hit OK and the preview window should automatically close with the Normalmap window.
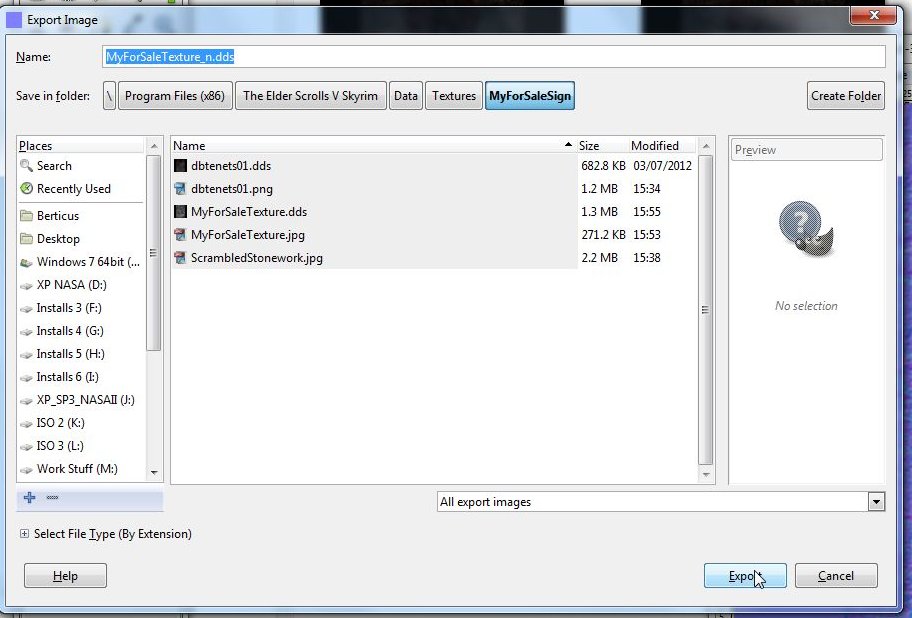
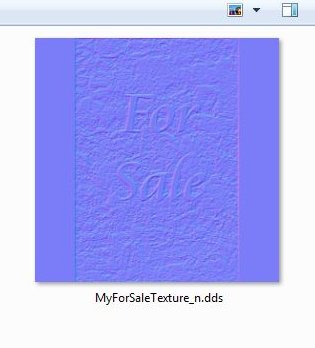
Now your normal map is ready click <File> and select <Export>.

Name your normal map the same as your texture but add "_n" to the end so you know what it is and click <Export>.
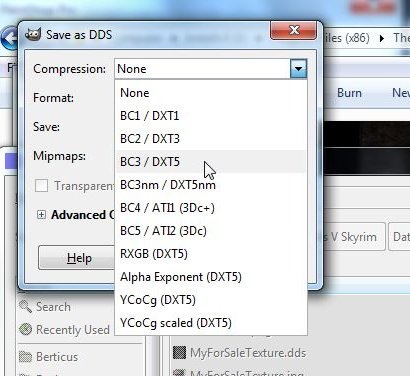
To finalize your normal map select <BC3/DXT5> from the <Compression> drop-down box,
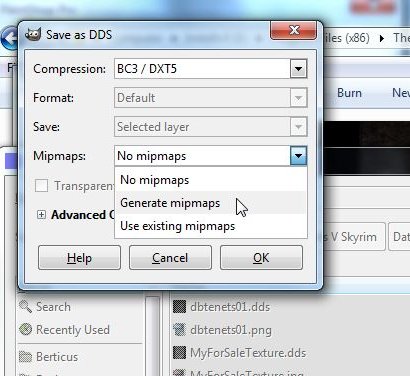
And <Generate mipmaps> from the <Mipmaps> drop-down box.
Now click OK to finish and close the two Gimp windows, the first is the one holding your normal map, you will be
asked if you want to save your changes, select No! And then close the Gimp background window.
You now have your normal map _n.dds in the same directory as your texture .dds.
Now that you've got your texture and normal map it's time to apply them to your object!
To start with we need to adjust the shine of the object, Gimp normal maps have a tendency to leave an object looking
glazed!
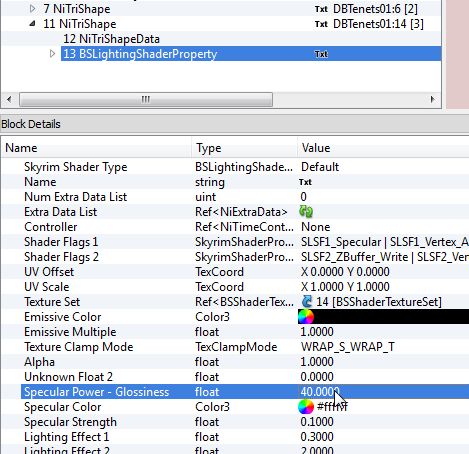
Back in NifScope click the mesh for your current texture and in it's tree select the <BSLightingShaderProperty>
branch. In the pane below you'll need to find two settings, <Specular Power - Glossiness> & <Specular Strength>.
As I want my stone to look weather smoothed I will leave it with a little shine, so in <Specular Power> I've gone for
a value of 40.0000
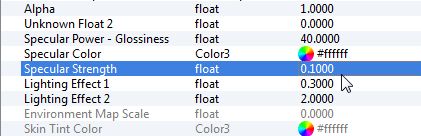
And for <Specular Strength> I've gone for a value of 0.1000
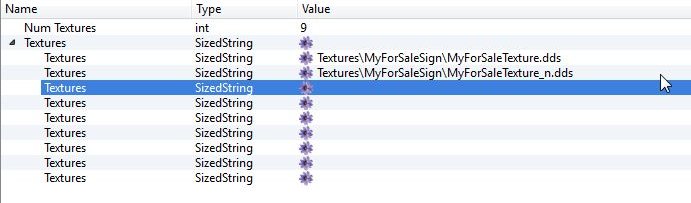
Now head to the bottom of that meshes branch and replace the original texture and normal map with yours, regular
texture (.dds) first then the normal map (_n.dds).
You can now save your object with a custom name and import it into the CK for use in-game!
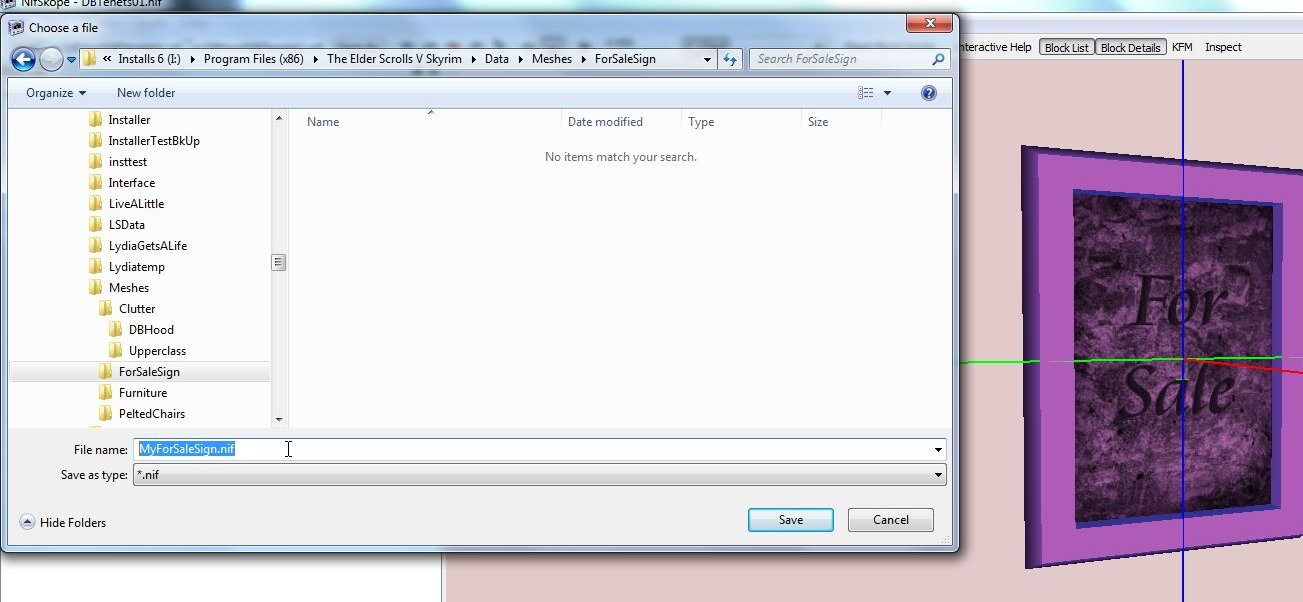
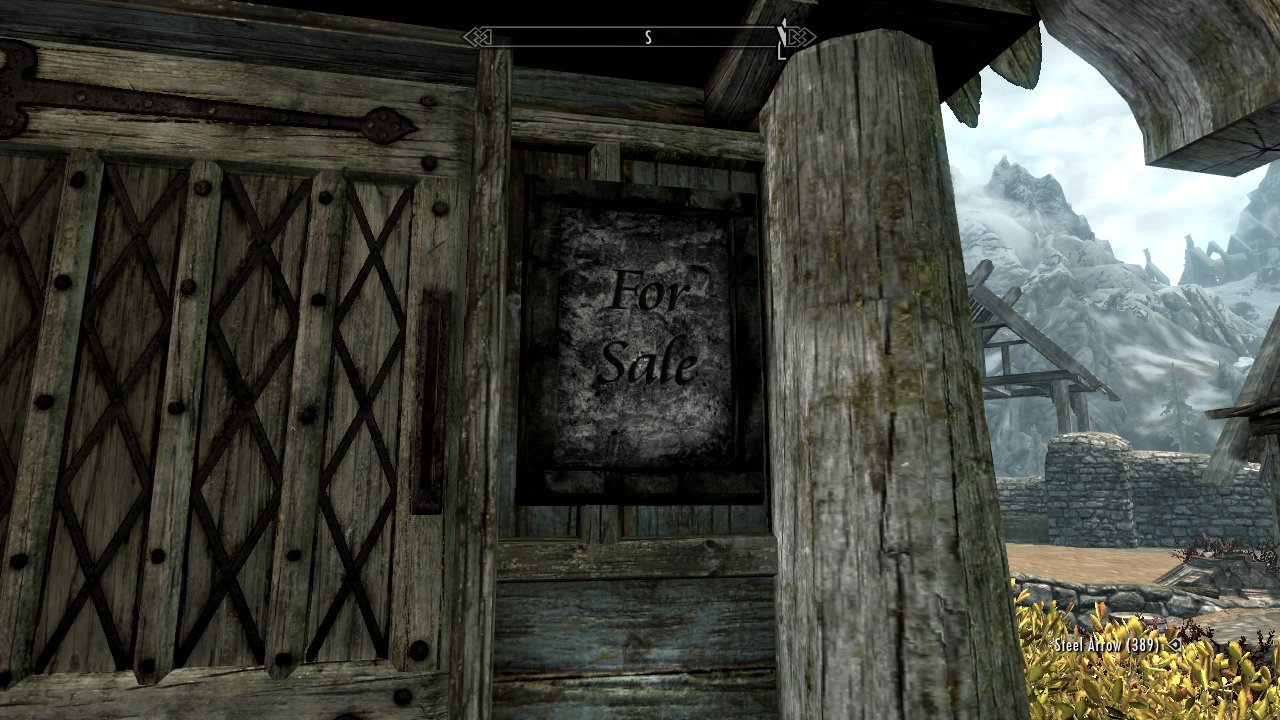
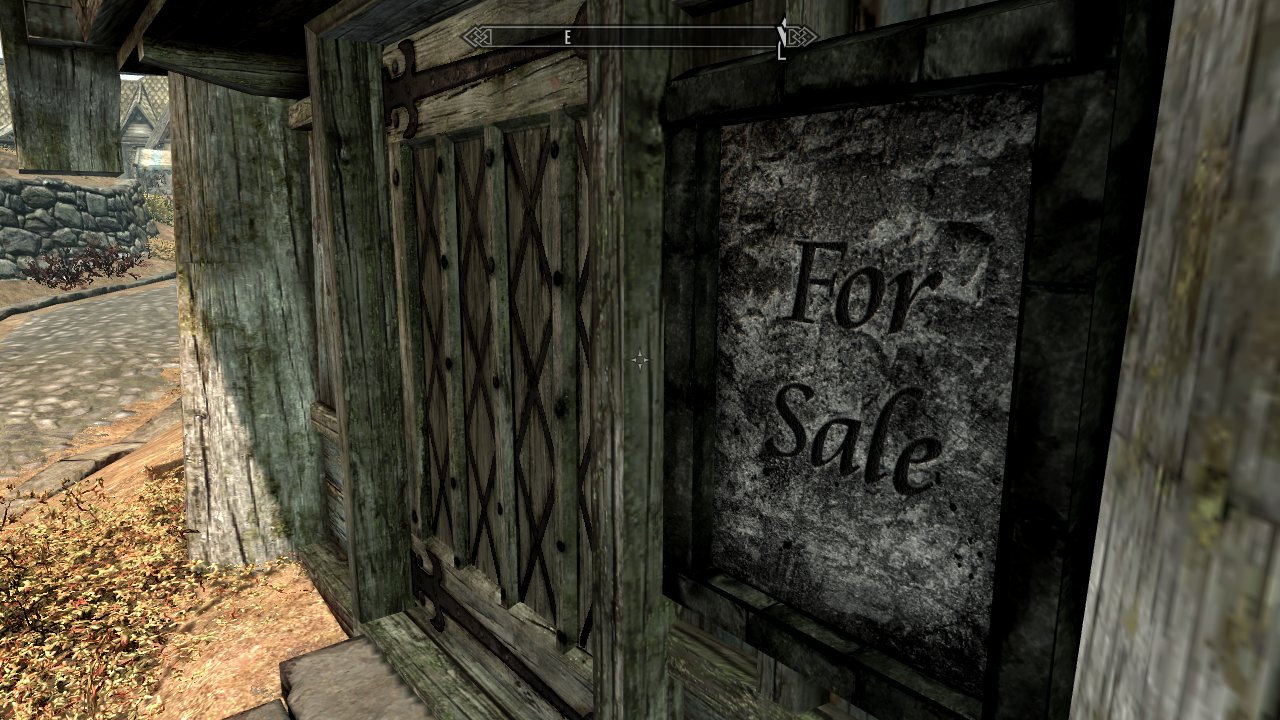
Here are a couple of images of my sign hung on the wall of Breezehome.
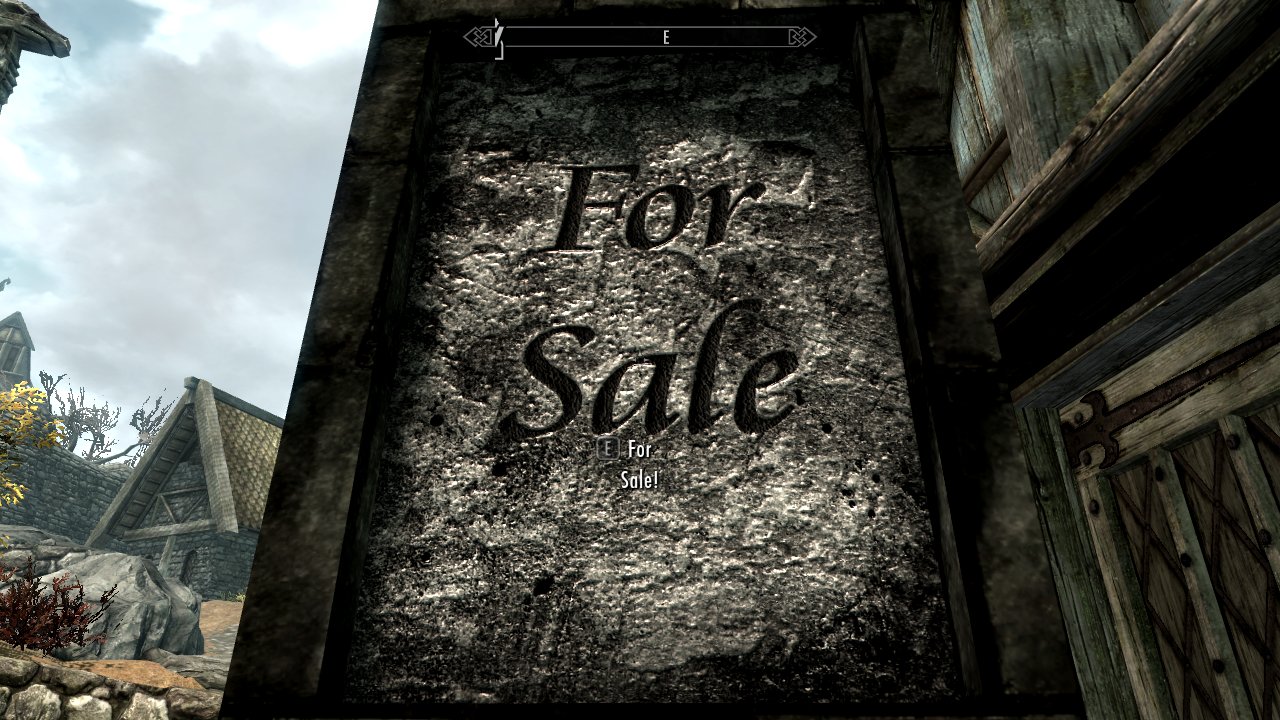
And one more where I've pulled the sign out of the shade and turned it to face the sun so you can see the effects of
the normal map more clearly.
As you can see, this version can also be activated, that will be the next tutorial: For Sale, Sold!
berticus0001
This tutorial is to show how to retexture standard objects in the game, this is not aimed at weapons or armour
though could be seen as a stepping stone towards that!
To start with you'll need more than just the CK, other software needed include:
FallOut Mod Manager
or
BSAOpt
For unpacking the game BSA files.
NifScope
Sage Thumbs
DDS Converter 2
Gimp 2
I also use PaintShop Pro for graphical editing but whatever graphics package you're familiar with should do
just as well.
Gimp also requires two DDS converter plugins (Info from Clintster via gentester):
Normal maps plug in from
http://code.google.com/p/gimp-normalmap/downloads/list
Download: gimp-normalmap-win32-1.2.2.zip or whichever is the most recent.
When the download is complete just do this to install:
Extract the normalmap.exe to the following directory: C:\Program Files\GIMP-2.0\lib\gimp\2.0\plug-ins
(For people on computers with "Program Files (x86)" it might be in there instead)
Extract the three .dll files to the following directory: C:\Program Files\GIMP-2.0\bin
(Same as before for those who are in the x86)
And
DDS plug in for Gimp
http://code.google.com/p/gimp-dds/downloads/list
You want the win32-2 etc etc etc, or whichever is most recent
Save the file to your desktop.
Navigate to "Local Disk C:" then "Program Files" or Program Files X86" if you have a 64 bits operating system.
Go to "GIMP-2.0," then "lib," then "gimp," then "2.0," and finally "plug-ins."
Double click on the " gimp-dds-win32-2.0.9.zip" file you downloaded and drag and drop the "dds.exe" file to the
"plug-ins" folder.
Ok, you've got your software installed and it's time to start!
The first thing you'll need to do is decide what you'll be retexturing! For this tutorial I'll be retexturing
DBTenets01 into a For Sale sign as I'll be using that in my next tutorial, For Sale, Sold!
Start by finding your object in the ck.
Now right-click and Edit your object and locate the name of the .nif which you'll need to export from the games
.bsa files.
Now load NifScope and open the .nif you exported. Depending on the object you are editing you may find that it
is made up from one or more than one mesh, clicking on any part of the object will show you the lines of the
polygons that make up the mesh, if only part of the object gets lines it means the object is made from multiple
meshes.
Also, depending on how a multi-mesh object is built, it may use one texture for all meshes or it may use one
texture per mesh.
As you can see, the object I'm using has more than one mesh but as i'll only be changing the center I only need
to worry about one texture.
Note that when I selected the mesh I want to edit NifScope automatically selected that mesh object in the object
tree to the left.
Open the highlighted branch all the way then in the lower pane open the <Textures> branch to see the textures
applied to this particular mesh.
More often than not you'll find at least two textures in the list, in this case DBTenets01.dds & DBTenets01_n.dds.
The "_n" denotes that this texture is a "Normal Map", often also referred to as a "Bump Map" or an "AV Map". These
"Maps" simulate the 3d effect of textures on an object to give it a feeling/look of depth.
The normal map can be ignored as we'll be making a new one for the new texture.
Locate and export the first .dds texture from the game .bsa files, we'll use this as a base guide-line for our new
texture.
Once exported, right-click your texture and in the Sage Thumbs context menu select "Convert to PNG".
PNG is a preference of mine as I feel it keeps more quality from the original though as I'll be completely replacing
the "used" part it would not matter either way whether it was PNG, JPG or anything else.
At this point it's up to you to edit the texture any way you like. As that could mean anything I won't take you
step-by-step through my changes and we'll just skip forwards to the end result, as you can see I've gone for a nice
granite texture, carved my for sale text into it and given it a recognizable name.
The next step is to convert your texture into a .dds format the game can use.
Open DDS Converter and navigate to the folder that holds your texture, type the first letter of your texture's name
into the <Image file list> box then select your image from the drop-down list that appears.
Now click the <./> button at the bottom to set the current folder as the conversion output folder,
and then click <Convert>. Your new .dds texture is then rendered to the same folder as the original.
Click <Close> when prompted.
Next up we'll create the "Normal" or "Bump" map. Open Gimp and open your new .dds file, when loaded select <Colors>
from the menu bar and click <Desaturate>,
then in the new window that opens select <Lightness> & tick <Preview> if they are not already selected.
This will turn your image black & white, as mine already is almost no difference is made.
Now select <Filters> from the menu bar and click <Map> then <Normalmap>.
When the Normalmap window opens you'll see an almost flawless blue square, below this is a <Preview> button, hit this
and maximize the preview window that opens in the background, you may need to move the Normalmap window aside as it
can get in the way a bit.
In the preview window you'll see a white plane, you can rotate this by holding left-click and pulling the mouse,
rotate the plane so you get the best contrast.
Now to set the depth of your normal map you can change two options, <Filter> & <Scale>. I've gone for a <Filter> of
9x9 and a <Scale> of 4.0000, this will give my texture a fairly deep 3d feel, you can play with those controls 'till
you feel you have a depth that is right for the type of object you are editing.
Once you're happy with the depth hit OK and the preview window should automatically close with the Normalmap window.
Now your normal map is ready click <File> and select <Export>.
Name your normal map the same as your texture but add "_n" to the end so you know what it is and click <Export>.
To finalize your normal map select <BC3/DXT5> from the <Compression> drop-down box,
And <Generate mipmaps> from the <Mipmaps> drop-down box.
Now click OK to finish and close the two Gimp windows, the first is the one holding your normal map, you will be
asked if you want to save your changes, select No! And then close the Gimp background window.
You now have your normal map _n.dds in the same directory as your texture .dds.
Now that you've got your texture and normal map it's time to apply them to your object!
To start with we need to adjust the shine of the object, Gimp normal maps have a tendency to leave an object looking
glazed!
Back in NifScope click the mesh for your current texture and in it's tree select the <BSLightingShaderProperty>
branch. In the pane below you'll need to find two settings, <Specular Power - Glossiness> & <Specular Strength>.
As I want my stone to look weather smoothed I will leave it with a little shine, so in <Specular Power> I've gone for
a value of 40.0000
And for <Specular Strength> I've gone for a value of 0.1000
Now head to the bottom of that meshes branch and replace the original texture and normal map with yours, regular
texture (.dds) first then the normal map (_n.dds).
You can now save your object with a custom name and import it into the CK for use in-game!
Here are a couple of images of my sign hung on the wall of Breezehome.
And one more where I've pulled the sign out of the shade and turned it to face the sun so you can see the effects of
the normal map more clearly.
As you can see, this version can also be activated, that will be the next tutorial: For Sale, Sold!
berticus0001