

The Double Load Trick
*Update: 1 small additional setting needs changing on the script, see text for second to last image-block.
Warnings of the dreaded Nav-Mesh bug that was a few lines down removed thanks to game updates fixing the nav-mesh!...mostly!
Ever crated a mod that you were very pleased with only to find that in-game every time you tried to exit the cell it crashed?
The usual reason for this is because the game can only handle so many objects in a cell! You can increase the amount of objects limit by
converting the mod into an esm (tutorial to come!), but this only raises the limit and very large mods can still reach it fairly easily!
To raise this limit even higher (though I'm sure at some point if you go too far your p.c will eventually slow to a crawl) you can apply
what I like to call "The Double Load Trick"
The basic principal is this: the game engine can only save a certain amount of data and load the worldspace you are loading into at the
same time before it runs out of memory and spits you to the desktop. This trick places a buffer cell between your cell and the worlspace
so the game engine only has to save your cell and load a tiny, practically empty cell, then save that empty cell and load the worldspace!
Thanks to Skottorp trawling through the 10,000 scripts we can add triggers to the new buffer cell to automatically transport you through
the buffer cell to the outside world without you ever seeing it!
Lets begin!
Firstly open the Creation Kit (from here on referred to as the CK), click the open folder icon on the toolbar and in the new window tick
Skyrim.esm then click OK to create a new mod from scratch, or select your already built mod instead.
Once the CK has loaded the base game files find an interior cell with an atmosperethat is close to what your mod will be or select the cell
of your current mod and duplicate it by right-mouse click and select <Duplicate Cell>. (Do not double click the cell to load it into the render
window just yet!!!)
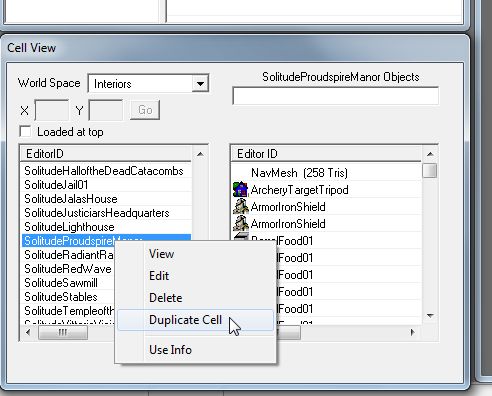
This creates an exact duplicate of the original cell with "DUPLICATE0001" added to the end of the name.
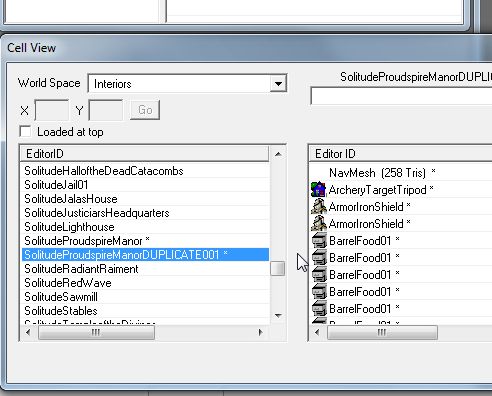
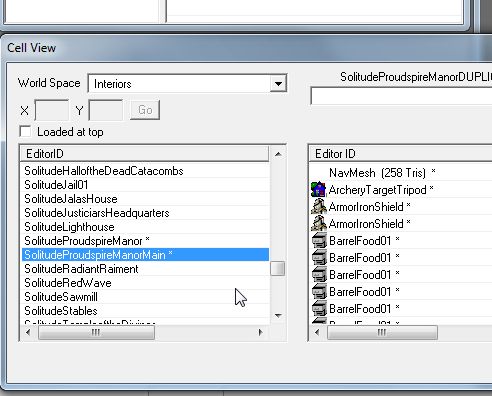
Now with the new cell selected, hit F2 on your keyboard, this will allow you to edit the name of the new cell. The name for this cell should
be close, but not identicle to the name for your actual mod, in this case it's the main entry to proudspire so, SolitudeProudspireMain.
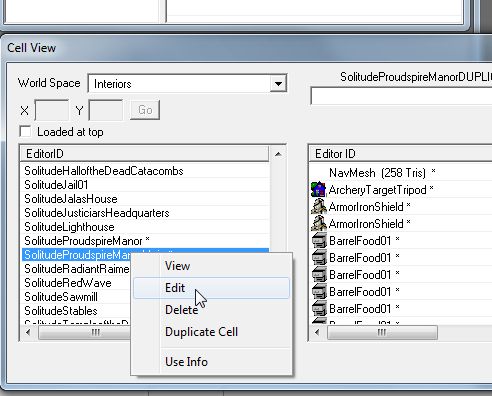
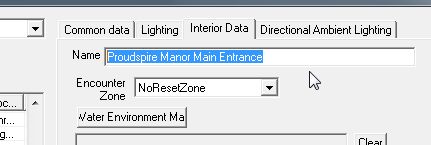
Next you need to give the new cell a unique interior name. This will be the name that is seen when you look at the door in-game. Right-click
the new cell and select edit to open the cell properties window, go to the<Interior Data> tab and change the name to your new doors name,in
this case "Proudspire Main Entrance"
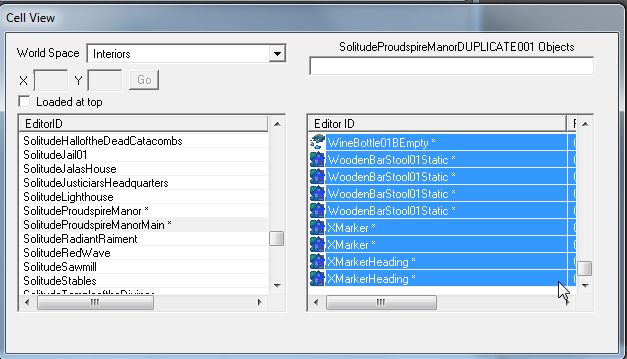
Now you need to clean out the contents of the cell that were copied when you duplicated the first one. Select the first object (not the nav-mesh)
then scroll all the way to the bottom and while holding Shift select the last object. This will automatically select all the objects in between.
Now hit the Delete button, click <Yes> on the warning that pops up and when the next, larger warning window opens hold down the <Enter> key to
skim through all the objects that require confirmation.
Once done select the cell above or below then yours again and the CK will refresh the object list so all you have left is the nav-mesh. Now select
that and hit delete and OK, switch cell and back again and now you have a completely empty cell! Now would be a good time to save!!
Now you have your empty cell it's time to build the double load frame work!
You can now double click your new cell to load it into the render window and you see..... nothing!! Which is correct because it's an empty cell!
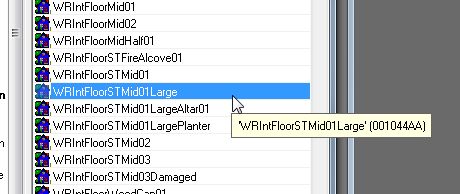
The first thing your going to need is a floor. Typre "floor" into the filter box in the object window and select <Statics>, this will fill the
window with every floor available. Scroll all the way to the bottom and about a quater of the way up you will notice three floors that have the
word "large" near or at the end of their names. These are twice the size of the avarage floor piece and will give you plenty of space to work in.
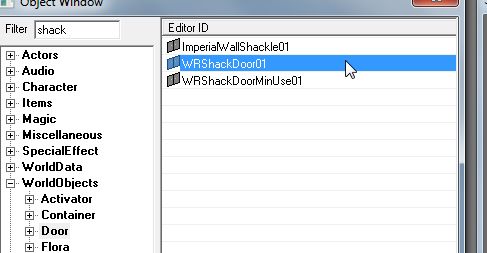
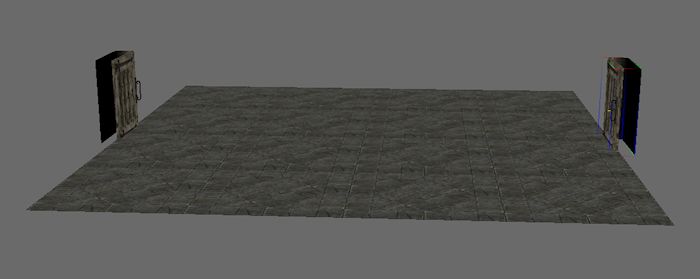
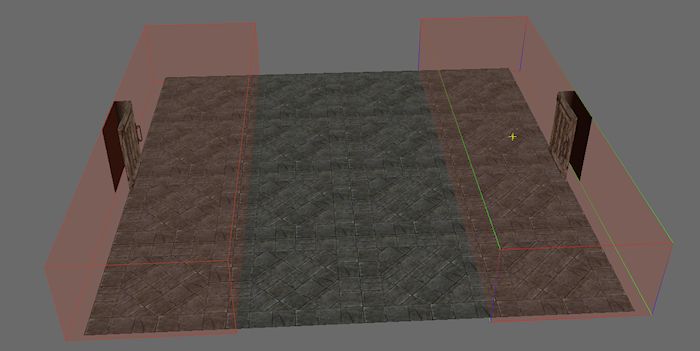
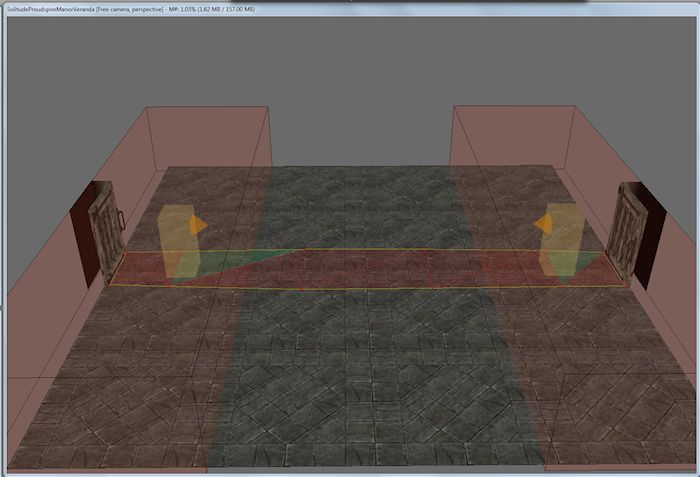
Drag the floor piece that ends in the word "large" into the render window. Next you need some doors so select <Static Collection> and in the
filter box type "shack" then select <Doors> and you will have three options, select and drag "WRShackDoor01" into the window twice and position
them at either end of the floor, facing each other.
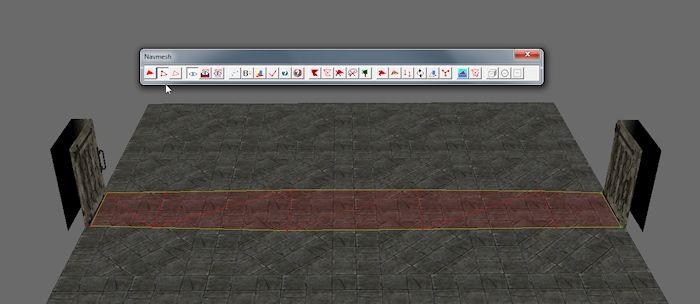
With the base of the cell now done (yeah, really!!) you need to create a nav-mesh between the two doors for companions to be able to pass through
the cell. The Creation Kit Wiki has an excellent tutorial for nav-meshing HERE so I won't go into detail other than to say the nav-mesh doesn't
have to cover the entire floor, just the space between the two doors.
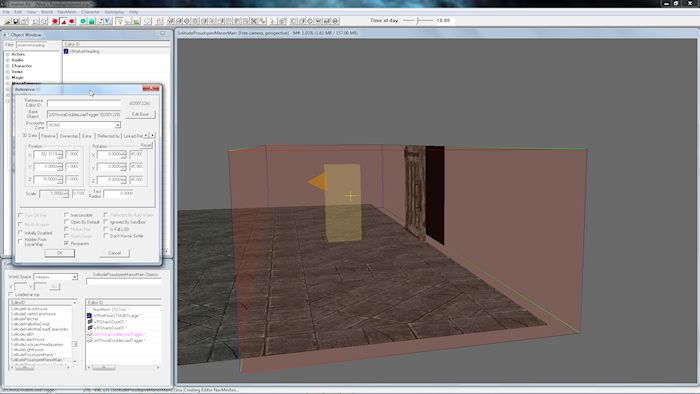
Now you need to create the triggers which will transport you directly to your destination without you even seeing this cell.
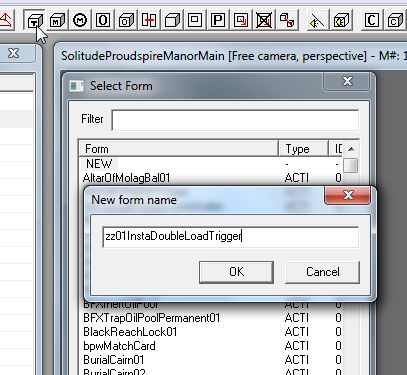
Start by holding the <Control> button and clicking the floor and both doors to select them all (or zoom out and scoop the lot!) then click the
<Trigger> button on the toolbar (the one that looks like a letter "T" in a cube) and click <New>. Give the new trigger a name that is recognizable
(I've gone for "InstaDoubleLoadTrigger") and click OK.
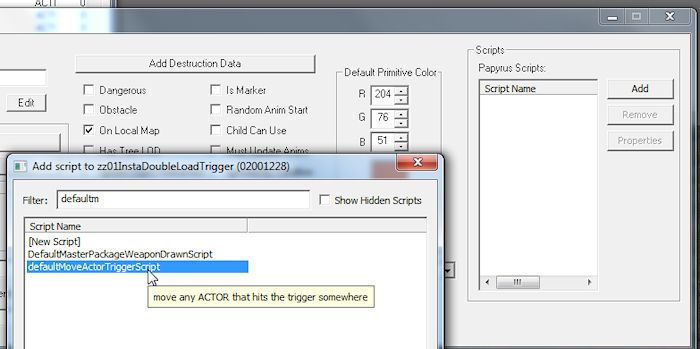
At the far right of the new window in the scripts section click <Add> and in the filter box type "defaultmoveactortriggerscript" to narrow down
your options untill you can see the desired script. Select the script and hit OK and OK again to take you all the way out.
You should now have a box that covers your floor and doors (if you can't see the box click the title bar of the render window and hit "M" on your
keyboard), using the sizing arrows resize the box untill it covers about a quater of the floor area then hit the "E" key twice to remove the
sizing arrows.
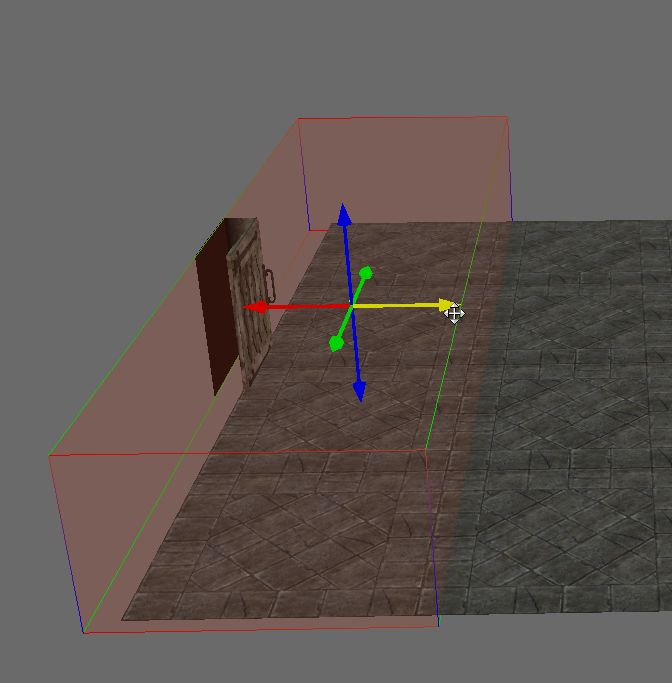
Now duplicate the trigger (Ctrl+D) and move the duplcate over the other end to cover the other door.
If your mod has more than one entrance you would now duplicate the the cell and give each duplication unique cell names and interior data names.
For this example with Proudspire i've altered the names to: Proudspire Manor Main Entrance, Trade Entrance and Veranda Entrance.

Time for a tidy up! Even though you initially deleted all the objects from the first duplicate cell the CK still stores all that object data in the
mods esp file and durring run-time will first generate all those objects then delete them, meaning more resorces being used and longer load times.
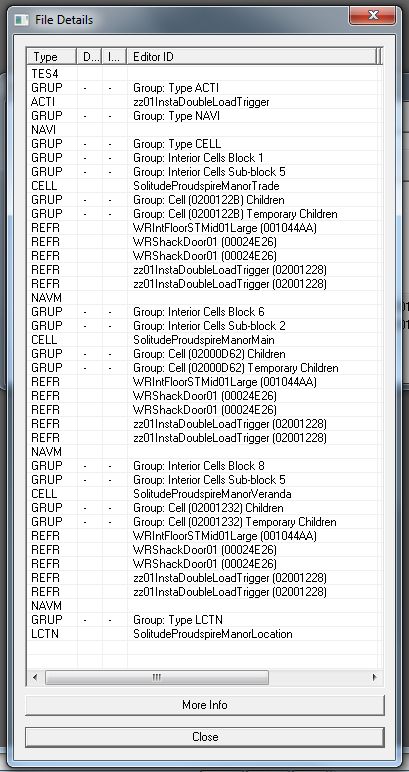
Start by saving your mod (which you should be doing occasionally anyway!) then click the <Open File> button and scroll to your mod esp. Select your
mod but this time click the <Details> button. In the new window click the "D" on the top bar which you would see is the begining of the word "Deleted"
if you was to expand that section, and this will shuffle all the objects that you have selected to be deleted to the top. Select the first entry then
scroll down to the last with the "D" on it and holding the <Shift> key click the last to select all those between.
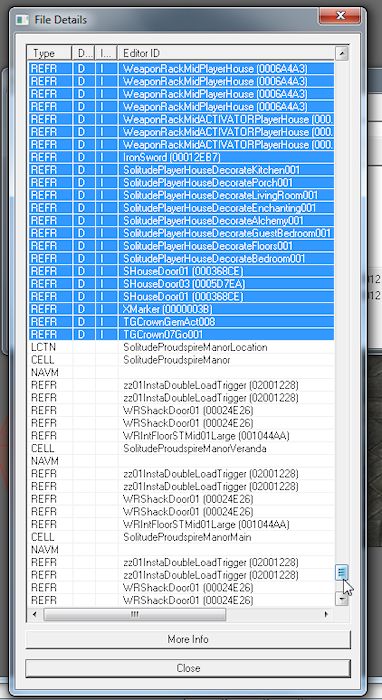
Now hit <Delete> on your keyboard and click OK on the warning that pops up. All those items with the "D" should now also have an "I" which stands for
Ignore. Click <Close> and then <OK> and the CK will now reload the mod but ignore all the stuff that should be gone but isn't. Once the CK has finished
reloading hit save. You now have a nice clean mod! Reopen the files list and check the <Details> again to be sure.
Now quit the CK and go get a cuppa! You deserve a break!! (No, really! Close the CK! It's not only good for the CK but a clean swapfile and ram is
always good for working on!)
If this is the start of your mod you would now go on to building the interior and exterior before connecting the doors. These will be covered in
the coming tutorial: Lone Wolf Cabin, for now I will assume that you have an interior and exterior ready to go!
Back from your tea break? Good, then we'll get the doors and triggers rigged!
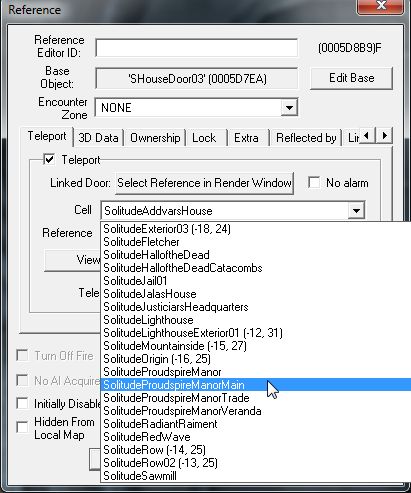
Reopen the CK and load your mod and go to the main mod cell (in the case of this example, SolitudeProudspireManor), find the door and double click it
to open the doors options window. In the first tab <Teleport> tick the teleport option and open the first of the two drop down boxes and type the first
few letters of the name of the double load cell (for me, solitudeproudspiremanormain) and the box will autoscroll to what you type (I just type "soli"
and scroll manually the rest of the way!). When you find the cell click it into the box and a door reference will appear in the second box. It doesn't
matter which of the two doors are selected, one will always go in and the other out!
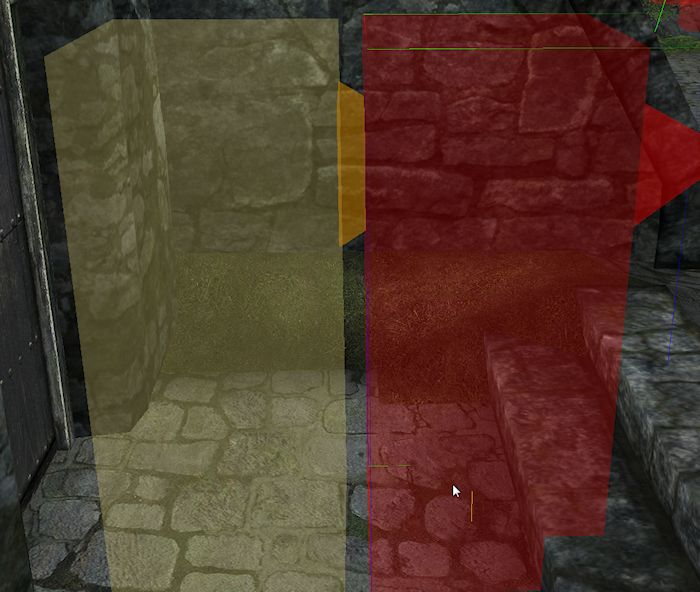
Hit OK and a large yellow box will appear in front, above or even inside the door. Manuaver the box (heading marker) into position inside the room and
lower it untill the bottom edge is juuuust below the ground then hold right-click on the box and pull the mouse left or right to rotate till the pointy
bit is facing the direction you want to be looking when you enter. Now type "xmarkerheading" into the object windows filter box and select <All>. Drag
the xmarkerheading (it's a big red verios of the yellow one!) into the render window and rotate and position just in front of the yellow heading marker.
This one doesn't need to be below the floor!
Repeat this process (connect teleport, position yellow heading marker, drag in and position red xmarkerheading) for any other doors in the cell to their
appropriate double load cells then finalize the interior nav-mesh. Now navigate to the exterior and repeat again with all exterior doors except this time
do not finalize the nav-mesh!!!!!
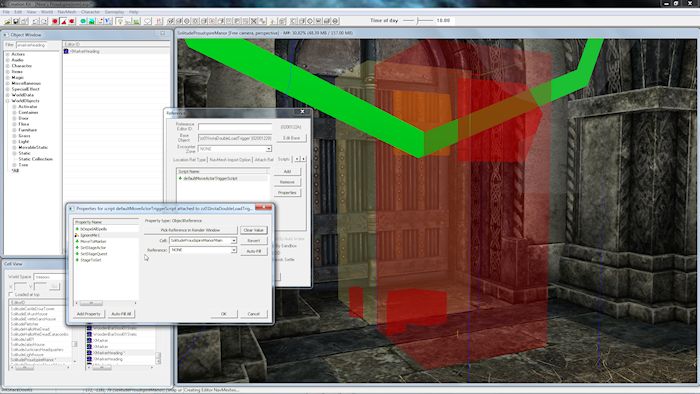
The last step is to connect the triggers in the double load cells to the red xmarkerheadings and finalize their nav-meshes. Go to the double load cell
and position the two new yellow heading marker to face each other with their bottom edges juuuust below the floor and finalize the nav-mesh.
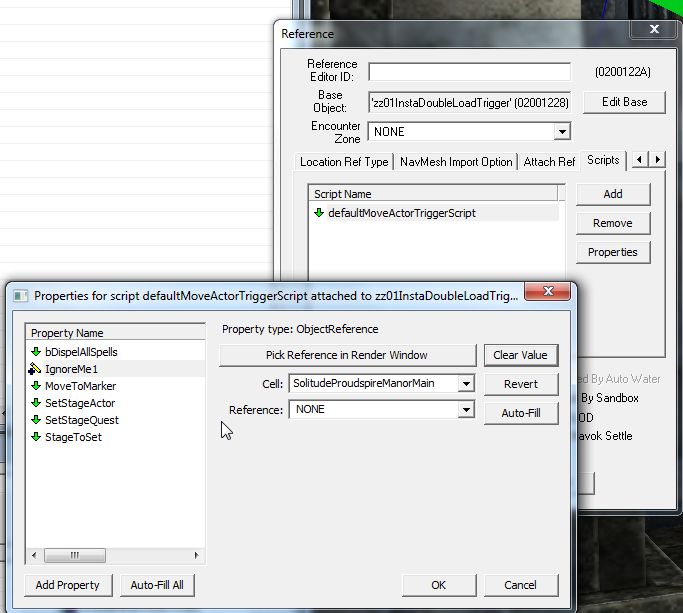
Now double click one of the large triggers and move the propertes window that opens off the render window.
Now double click the opposite door and in the <Teleport> tab click <View Teleport Marker>. This will take you to the yellow heading marker for that
door. Position the camera so you can clearly see the red xmarkerheading and, going back to the properties window for the trigger that you moved aside,
scroll along to the <Scripts> tab and select the script "defaultMoveActerTriggerScript" and click <properties>. Select <IgnoreMe1> and click <Change Value>.
*Update: You will also need to select the first setting, <bDispel All Spells>, click <Edit Value> and ensure the setting is NOT enabled else the engine will enable
it by default and any spells applied to yourself or any NPC's will be dispelled! This includes protection, stat enhancements, bound weapons & conjured thralls
& creatures!
Thanks to Gentester for pointing this out!
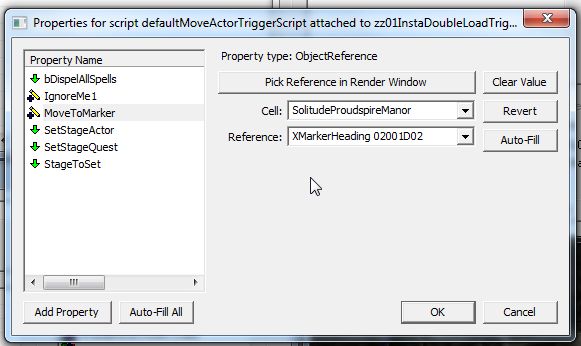
Then select <MoveToMarker>, click <Change Value> and then click <Pick Reference in Render Window>. This will change your cursor into a target which you then
double click on the red xmarkerheading and all the needed info will be automatically stored in the appropriate boxes.
Repeat this process for the other trigger in the double load cell to the other red xmarkerheading through the other door and then again for any other doors
and double load cells.
All Done!! Save, quit and try it out!
Full credit to Skottorp :
Proudspire - A Beginners Kit by Skottorp
for figuring this one out!!
*Update: 1 small additional setting needs changing on the script, see text for second to last image-block.
Warnings of the dreaded Nav-Mesh bug that was a few lines down removed thanks to game updates fixing the nav-mesh!...mostly!
Ever crated a mod that you were very pleased with only to find that in-game every time you tried to exit the cell it crashed?
The usual reason for this is because the game can only handle so many objects in a cell! You can increase the amount of objects limit by
converting the mod into an esm (tutorial to come!), but this only raises the limit and very large mods can still reach it fairly easily!
To raise this limit even higher (though I'm sure at some point if you go too far your p.c will eventually slow to a crawl) you can apply
what I like to call "The Double Load Trick"
The basic principal is this: the game engine can only save a certain amount of data and load the worldspace you are loading into at the
same time before it runs out of memory and spits you to the desktop. This trick places a buffer cell between your cell and the worlspace
so the game engine only has to save your cell and load a tiny, practically empty cell, then save that empty cell and load the worldspace!
Thanks to Skottorp trawling through the 10,000 scripts we can add triggers to the new buffer cell to automatically transport you through
the buffer cell to the outside world without you ever seeing it!
Lets begin!
Firstly open the Creation Kit (from here on referred to as the CK), click the open folder icon on the toolbar and in the new window tick
Skyrim.esm then click OK to create a new mod from scratch, or select your already built mod instead.
Once the CK has loaded the base game files find an interior cell with an atmosperethat is close to what your mod will be or select the cell
of your current mod and duplicate it by right-mouse click and select <Duplicate Cell>. (Do not double click the cell to load it into the render
window just yet!!!)
This creates an exact duplicate of the original cell with "DUPLICATE0001" added to the end of the name.
Now with the new cell selected, hit F2 on your keyboard, this will allow you to edit the name of the new cell. The name for this cell should
be close, but not identicle to the name for your actual mod, in this case it's the main entry to proudspire so, SolitudeProudspireMain.
Next you need to give the new cell a unique interior name. This will be the name that is seen when you look at the door in-game. Right-click
the new cell and select edit to open the cell properties window, go to the<Interior Data> tab and change the name to your new doors name,in
this case "Proudspire Main Entrance"
Now you need to clean out the contents of the cell that were copied when you duplicated the first one. Select the first object (not the nav-mesh)
then scroll all the way to the bottom and while holding Shift select the last object. This will automatically select all the objects in between.
Now hit the Delete button, click <Yes> on the warning that pops up and when the next, larger warning window opens hold down the <Enter> key to
skim through all the objects that require confirmation.
Once done select the cell above or below then yours again and the CK will refresh the object list so all you have left is the nav-mesh. Now select
that and hit delete and OK, switch cell and back again and now you have a completely empty cell! Now would be a good time to save!!
Now you have your empty cell it's time to build the double load frame work!
You can now double click your new cell to load it into the render window and you see..... nothing!! Which is correct because it's an empty cell!
The first thing your going to need is a floor. Typre "floor" into the filter box in the object window and select <Statics>, this will fill the
window with every floor available. Scroll all the way to the bottom and about a quater of the way up you will notice three floors that have the
word "large" near or at the end of their names. These are twice the size of the avarage floor piece and will give you plenty of space to work in.
Drag the floor piece that ends in the word "large" into the render window. Next you need some doors so select <Static Collection> and in the
filter box type "shack" then select <Doors> and you will have three options, select and drag "WRShackDoor01" into the window twice and position
them at either end of the floor, facing each other.
With the base of the cell now done (yeah, really!!) you need to create a nav-mesh between the two doors for companions to be able to pass through
the cell. The Creation Kit Wiki has an excellent tutorial for nav-meshing HERE so I won't go into detail other than to say the nav-mesh doesn't
have to cover the entire floor, just the space between the two doors.
Now you need to create the triggers which will transport you directly to your destination without you even seeing this cell.
Start by holding the <Control> button and clicking the floor and both doors to select them all (or zoom out and scoop the lot!) then click the
<Trigger> button on the toolbar (the one that looks like a letter "T" in a cube) and click <New>. Give the new trigger a name that is recognizable
(I've gone for "InstaDoubleLoadTrigger") and click OK.
At the far right of the new window in the scripts section click <Add> and in the filter box type "defaultmoveactortriggerscript" to narrow down
your options untill you can see the desired script. Select the script and hit OK and OK again to take you all the way out.
You should now have a box that covers your floor and doors (if you can't see the box click the title bar of the render window and hit "M" on your
keyboard), using the sizing arrows resize the box untill it covers about a quater of the floor area then hit the "E" key twice to remove the
sizing arrows.
Now duplicate the trigger (Ctrl+D) and move the duplcate over the other end to cover the other door.
If your mod has more than one entrance you would now duplicate the the cell and give each duplication unique cell names and interior data names.
For this example with Proudspire i've altered the names to: Proudspire Manor Main Entrance, Trade Entrance and Veranda Entrance.
Time for a tidy up! Even though you initially deleted all the objects from the first duplicate cell the CK still stores all that object data in the
mods esp file and durring run-time will first generate all those objects then delete them, meaning more resorces being used and longer load times.
Start by saving your mod (which you should be doing occasionally anyway!) then click the <Open File> button and scroll to your mod esp. Select your
mod but this time click the <Details> button. In the new window click the "D" on the top bar which you would see is the begining of the word "Deleted"
if you was to expand that section, and this will shuffle all the objects that you have selected to be deleted to the top. Select the first entry then
scroll down to the last with the "D" on it and holding the <Shift> key click the last to select all those between.
Now hit <Delete> on your keyboard and click OK on the warning that pops up. All those items with the "D" should now also have an "I" which stands for
Ignore. Click <Close> and then <OK> and the CK will now reload the mod but ignore all the stuff that should be gone but isn't. Once the CK has finished
reloading hit save. You now have a nice clean mod! Reopen the files list and check the <Details> again to be sure.
Now quit the CK and go get a cuppa! You deserve a break!! (No, really! Close the CK! It's not only good for the CK but a clean swapfile and ram is
always good for working on!)
If this is the start of your mod you would now go on to building the interior and exterior before connecting the doors. These will be covered in
the coming tutorial: Lone Wolf Cabin, for now I will assume that you have an interior and exterior ready to go!
Back from your tea break? Good, then we'll get the doors and triggers rigged!
Reopen the CK and load your mod and go to the main mod cell (in the case of this example, SolitudeProudspireManor), find the door and double click it
to open the doors options window. In the first tab <Teleport> tick the teleport option and open the first of the two drop down boxes and type the first
few letters of the name of the double load cell (for me, solitudeproudspiremanormain) and the box will autoscroll to what you type (I just type "soli"
and scroll manually the rest of the way!). When you find the cell click it into the box and a door reference will appear in the second box. It doesn't
matter which of the two doors are selected, one will always go in and the other out!
Hit OK and a large yellow box will appear in front, above or even inside the door. Manuaver the box (heading marker) into position inside the room and
lower it untill the bottom edge is juuuust below the ground then hold right-click on the box and pull the mouse left or right to rotate till the pointy
bit is facing the direction you want to be looking when you enter. Now type "xmarkerheading" into the object windows filter box and select <All>. Drag
the xmarkerheading (it's a big red verios of the yellow one!) into the render window and rotate and position just in front of the yellow heading marker.
This one doesn't need to be below the floor!
Repeat this process (connect teleport, position yellow heading marker, drag in and position red xmarkerheading) for any other doors in the cell to their
appropriate double load cells then finalize the interior nav-mesh. Now navigate to the exterior and repeat again with all exterior doors except this time
do not finalize the nav-mesh!!!!!
The last step is to connect the triggers in the double load cells to the red xmarkerheadings and finalize their nav-meshes. Go to the double load cell
and position the two new yellow heading marker to face each other with their bottom edges juuuust below the floor and finalize the nav-mesh.
Now double click one of the large triggers and move the propertes window that opens off the render window.
Now double click the opposite door and in the <Teleport> tab click <View Teleport Marker>. This will take you to the yellow heading marker for that
door. Position the camera so you can clearly see the red xmarkerheading and, going back to the properties window for the trigger that you moved aside,
scroll along to the <Scripts> tab and select the script "defaultMoveActerTriggerScript" and click <properties>. Select <IgnoreMe1> and click <Change Value>.
*Update: You will also need to select the first setting, <bDispel All Spells>, click <Edit Value> and ensure the setting is NOT enabled else the engine will enable
it by default and any spells applied to yourself or any NPC's will be dispelled! This includes protection, stat enhancements, bound weapons & conjured thralls
& creatures!
Thanks to Gentester for pointing this out!
Then select <MoveToMarker>, click <Change Value> and then click <Pick Reference in Render Window>. This will change your cursor into a target which you then
double click on the red xmarkerheading and all the needed info will be automatically stored in the appropriate boxes.
Repeat this process for the other trigger in the double load cell to the other red xmarkerheading through the other door and then again for any other doors
and double load cells.
All Done!! Save, quit and try it out!
Full credit to Skottorp :
Proudspire - A Beginners Kit by Skottorp
for figuring this one out!!